How to Play Ark Nova if you hate rulebooks
I love games but hate going through the rulebook. This guide on how to play Ark Nova will help you quickly understand the game and get started fast.
Looking to find out more about Ark Nova, click here to discover if this the game for you.
What is the goal?
- Plan and build a modern, scientifically managed zoo.
- Zoo Management involves:
- Building enclosures suited to animals’ lifestyles.
- Supporting conservation projects to preserve species.
- Progressing the zoo involves driving
- Appeal: Attract diverse animals to increase zoo appeal and generate higher revenues.
- Conservation: Support conservation projects like breeding programs to gain bonuses.
- Game ends when Appeal and Conservation counters meet; the best combination of both wins.
- Association Work: Partner with zoos and universities worldwide, aided by specialists and sponsors to achieve goals.
Ark Nova Setup
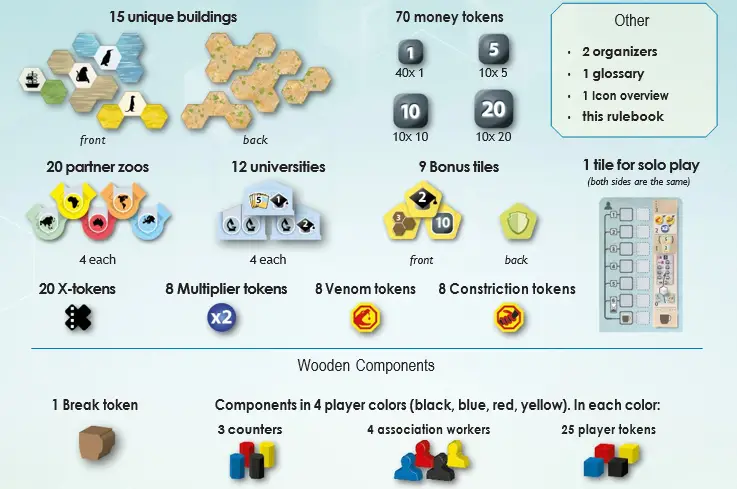
Global Setup
- Place the game board in the center of the table.
- Place the Break token on the start space of the Break track corresponding to player count.
- Shuffle the Zoo cards to create a face-down deck on the marked space on the game board.
- Deal 6 face-down cards to the display spaces on the game board (turn face-up at the end of setup).
- Place the 2 organizers next to the game board.
- Shuffle the 9 Bonus tiles and place a random tile face up on each of the 4 blank yellow Bonus spaces.
- Return the remaining 5 Bonus tiles to the box.
- Fill one organizer with enclosures and the other with remaining tiles and tokens.
- Pack a few standard enclosures and kiosks/pavilions in a bag as a reserve.
- Use suitable substitutes if components run out.
Ark Nova Personal Setup Steps
- Take a random Map A zoo map and place it in front of you; return remaining maps to the box.
- Take one set of Action cards (Build, Cards, Animals, Association, Sponsors). Place each card with side I up under the five slots on your zoo map (Animals card in the leftmost slot).
- Place the Association board next to the game board with enough room for cards above and below.
- Place 1 partner zoo of each continent and 1 university of each kind on the Association board.
- Shuffle Base Conservation Project cards and place them face-down next to the Association board; in a 4-player game, place the top 4 face-up below the board, otherwise the top 3.
- In a 2-player game, use 6 player tokens of an unused color to block specific spaces on the Base Conservation Project cards and Association board.
- Shuffle Final Scoring cards and place them face-down next to the Association board.
- Determine a start player randomly; turn order is clockwise.
- Choose a color and take all components of that color.
- Place appeal, conservation, and reputation counters on the first spaces of their tracks on the game board. Position Appeal counters according to turn order (start player on space 0, second on space 1, etc.).
- Place 7 player tokens on the designated spaces at the left edge of your zoo map; keep remaining tokens nearby.
- Place 1 association worker on the notepad of your zoo map as the active worker; place the remaining 3 lying down below the notepad.
- Take 25 money from the supply and put it on the notepad of your zoo map.
- Draw 2 Final Scoring cards and place them next to your zoo map (keep hidden).
- Draw 8 Zoo cards, keep 4 as hand cards, and discard the other 4 face-up to the discard pile on the board (keep hand cards hidden).
- After choosing hand cards, reveal the 6 cards on the display.
Gameplay
- Turn Structure:
- No formal rounds; players take turns in clockwise order.
- Each turn consists of performing one action.
- Actions are performed using the 5 Action cards below your zoo map.
- Breaks:
- Occur between turns when the game is paused for an administration phase.
- During breaks:
- Discard cards down to your hand limit.
- Recall workers.
- Gain income and perform other administrative tasks.
- Actions:
- Expand your zoo, play Zoo cards, and draw new Zoo cards.
- The position of the Action card determines the strength and scope of the action.
- Actions may trigger additional effects and bonuses.
Your Zoo Map
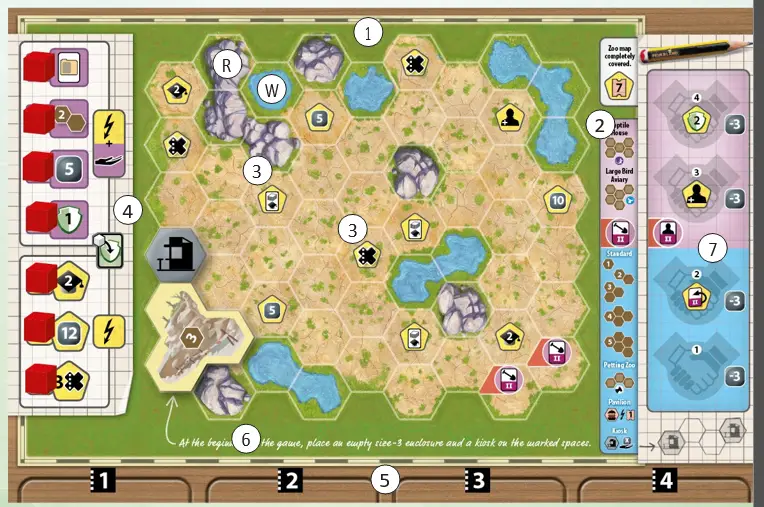
- Zoo Area:
- Located in the middle of the map.
- Place buildings such as enclosures (standard or special), kiosks, pavilions, or unique buildings.
- Overview of all enclosures shows sizes and shapes.
- Building Restrictions:
- Cannot build on rock (R) and water (W) spaces.
- Some animals need enclosures next to rock or water spaces.
- Certain spaces require upgrading the Build action card to build on them.
- Placement Bonuses:
- Some spaces offer immediate bonuses when covered.
- Bonuses are explained in the Icon overview.
- Conservation Project Bonuses:
- Left edge has bonus spaces activated by supporting conservation projects.
- Start with 7 player tokens on these spaces.
- Placing tokens on Conservation Project cards provides immediate and recurring bonuses.
- Action Card Slots:
- Located at the bottom of the map.
- The number above each slot indicates the strength of the Action card in that slot.
- Special Abilities:
- Advanced maps have unique abilities for each zoo.
- Map A (recommended for the first game) has the same special ability for all players.
- Start with a 3-space enclosure on indicated spaces with the number 3 side up.
- Partner Zoos and Universities:
- Right side of the zoo map has spaces for 5 partner zoos (one for each continent) and 3 universities.
- Max 4 partner zoos can be established; need to upgrade Association action card for the third partner zoo.
- Place new partnership tiles on the lowest empty space of the appropriate column.
- Receive immediate bonuses if depicted on the placement space.
- Partner zoos reduce animal placement costs by 3 money per continent icon on the Animal card.
- Universities grant bonuses and icons shown on the tile.
- Additional Association Workers:
- Supply spaces for additional workers located to the right.
- Use workers from the bottom to the top; remove workers rather than placing tiles.
- Hire a worker by moving one from the supply to the notepad as an active worker.
- Certain zoo maps provide conservation points for hiring the last worker.
- Notepad:
- Stores available association workers, money, and X-tokens.
The Break Track

- Purpose:
- Counts down time until the next break.
- Setup:
- Place the Break token on the starting space corresponding to player count at the beginning of the game and after each break.
- Advancement:
- Move the Break token the appropriate number of spaces towards the end of the track during gameplay.
- Triggering a Break:
- When the Break token reaches the last space, a break is called after the current turn ends.
- Gain 1 X-token for reaching the last space.
- Ignore any additional steps once the end is reached.
- Post-Break:
- Place the Break token back on the starting space after the break.
Zoo Cards
Animal Cards
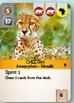
- Used to add animals to your zoo.
- Require an empty enclosure.
- Provide appeal points for your zoo.
Sponsor Cards

- Allow you to hire specialists.
- Enable the building of unique buildings.
- Provide various other effects and benefits.
Conservation Project Cards
- Support conservation projects to collect conservation points.
- Specialize in specific animal species and their continents of origin.
- Some projects involve reintroducing animals into the wild.
- Includes Base Conservation Project cards available at the start of the game.
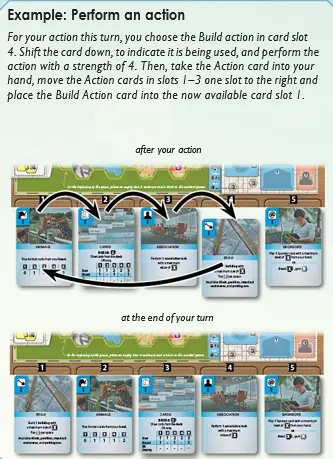
Action Cards
- Action Cards:
- Located below your zoo map, each in a specific slot (1 to 5).
- The slot number indicates the strength of the action (1 is weakest, 5 is strongest).
- Performing Actions:
- Choose one Action card to perform its action.
- Shift the chosen card to the lowest slot and perform the action with the indicated strength.
- Move all other cards left, filling the empty slot with the chosen card.
- Use X-tokens to increase action strength (1 X-token = +1 strength, max 5 tokens).
- Card Upgrades:
- Start with Action cards on side I.
- Upgrade allows flipping a card to side II, improving the action.
- Mandatory Actions:
- You must perform an action; you cannot skip or do nothing.
- Types of Actions Cards:
- Cards: Gain new Zoo cards (Animal, Sponsor, Conservation Project).
- Build: Construct standard or special enclosures, kiosks, pavilions.
- Animals: Add animals to enclosures, meeting specific conditions and paying costs.
- Association: Send workers to perform tasks, increase reputation, gain partners, support projects.
- Sponsors: Gain support from sponsors, fund unique buildings, receive ongoing effects or income.
- X-Token: Gain 1 X-token if unable to perform any other action.
- Special Effects:
- Some Zoo cards trigger effects after completing an action.
- Complete the action and move cards before executing these effects.
Cards Action
Advance Break Token 2 spaces then draw cards from deck or snap

- Drawing Cards from deck
- Compare action strength with the table on the card.
- Draw the indicated number of cards from the deck (up to 3).
- Discard a card from your hand if required (can be a newly drawn card or an existing card).
- Snapping
- If action strength is at least 5, you can take 1 card from the display instead of drawing from the deck.
- Snapping allows taking any card, regardless of zoo reputation.
- Replenish the display at the end of your turn.
- Hand Limit
- After this action, you can have any number of cards.
- Discard down to hand limit (3 cards, or 5 with a specific university) during a break
Advance Break Token 2 spaces then draw cards from deck or withing reputation range or snap

- Drawing Within Reputation Range:
- Draw cards from the display (up to your Reputation counter) and/or from the deck.
- The table on the card is upgraded for better action details.
- Draw in any order, but do not replenish the display until the turn ends.
- Snapping:
- Snap at a lower strength level, starting from strength 3.
- Snapping works the same regardless of higher strength levels.
- Reputation Track:
- Continue progressing past 9 reputation after upgrading the Cards action
Reputation Track and Display
- Reputation Track:
- Track zoo reputation with the counter.
- Increase reputation by advancing the counter 1 step.
- To exceed 9 reputation, upgrade the Cards Action card to side II.
- Bonuses are taken immediately when reaching a space with a bonus.
- At space 15, further reputation increases give 1 appeal per step.
- Reputation Range:
- The counter’s position determines which display cards are within reputation range.
- Cards within range are those on the same folder as the counter and all lower-numbered folders.
- Display Management:
- Do not replenish the display until the end of your turn.
- Move higher-numbered folder cards to lower-numbered folders without changing the order.
- Fill empty spaces with cards from the deck.
- Discard Pile:
- Located next to the display.
- Cannot look through the discard pile during the game.
Build Action
Build exactly 1 building of your choice with a maximum size of on your zoo map. Pay 2 money per space.
Available: Kiosk, pavilion, standard enclosure, and Petting Zoo

- Building Sizes:
- Measured by the number of spaces covered on your zoo map.
- Available buildings:
- Kiosk (size 1)
- Pavilion (size 1)
- Standard enclosures (sizes 1-5)
- Petting Zoo (special enclosure size 3, max 1 per zoo)
- Building Costs:
- Cost = size x2 money.
- Pay cost to the general supply before placing the building.
- Types and Benefits:
- Enclosures: Required for housing animals.
- Kiosks: Provide income during breaks.
- Pavilions: Increase zoo appeal by 1 immediately (one-time).
- Building Restrictions:
- Can build multiple different buildings in one action, but not identical buildings.
- Total size of buildings must not exceed the zoo map limits.
- Must build adjacent to an existing building (first building must touch a border space).
- Cannot build on water, rock spaces, or icon spaces until upgrading the Build action.
- Kiosks must be at least 3 spaces apart.
- Special Enclosures:
- Large Bird Aviary and Reptile House (size 5) available after upgrading the Build action.
- Max 1 of each special enclosure per zoo.
- Move animals to new special enclosures immediately after building.
- Placement Bonuses:
- Covering spaces with bonus icons grants immediate bonuses.
- Bonuses are explained in the Icon overview.
- Unique Buildings:
- Cannot be built with the Build action, only via Sponsor cards.
Build as many different buildings as you like with a maximum total size of on your zoo map. Newly available: Large Bird Aviary and Reptile House.

- Special Enclosures:
- Large Bird Aviary and Reptile House:
- Both size 5.
- Each zoo can accommodate only 1 of each.
- Both sides of these enclosures are the same.
- Moving Animals:
- When built, you may immediately move animals from a standard enclosure to the new special enclosure.
- This move can only be done at the time of building.
- Large Bird Aviary and Reptile House:
- Unique Buildings:
- Cannot be built with the Build action; only through associated Sponsor cards.
- Multiple Buildings:
- Build several buildings with one action.
- Cannot build 2 identical buildings in the same action.
- Total size of buildings must not exceed the zoo map limits.
- Build buildings one after another, paying for each separately.
- Take placement bonuses immediately if a bonus icon is covered.
- Do not take “after finishing” bonuses until the Build action is completed.
- Additional Building Spaces:
- Upgrading allows building on spaces with specific icons.
- Can cover every space on the zoo map except water and rock spaces.
- If all spaces are covered, immediately increase zoo appeal by 7.
Animals Action
Play Animal cards from your hand.

- Determine Action Strength:
- Compare the action strength with the table on the card.
- Play up to the indicated number of Animal cards from your hand.
- Steps for Playing an Animal Card:
- Check Conditions:
- Fulfill conditions on the left side of the card (e.g., specific partner zoo, animal category, continent icons).
- Refer to the Icon overview for detailed explanations.
- Pay Cost:
- Pay the cost in the upper-left corner of the Animal card.
- Partner zoos reduce the cost by 3 money per continent icon.
- Pay into the general supply; any money gained is taken later.
- Fill Empty Enclosure:
- Place the animal in a free space in an appropriate enclosure.
- Flip the enclosure to its occupied side.
- Some animals require enclosures next to water/rock spaces.
- Petting Zoo animals must go in the Petting Zoo; reptiles and some birds can go in standard or special enclosures.
- Place Animal Card:
- Place the Animal card next to your zoo map.
- Execute Effects:
- Increase zoo appeal and advance the counter.
- Some animals provide conservation points or increase reputation.
- Execute effects immediately unless specified as “after finishing”.
- If multiple effects occur, choose the order of execution.
- Check Conditions:
- Multiple Animal Cards:
- If playing 2 Animal cards, complete all steps for the first card before moving to the second.
- Only after moving the Animals Action card to slot 1, execute “after finishing” effects.
Play Animal cards from your hand or within reputation range.

- Play Animal Cards from Display:
- Can play Animal cards directly from the display.
- Card must be within your reputation range.
- Pay the animal cost plus an additional amount equal to the folder number.
- Playing Multiple Animal Cards:
- Can play 2 Animal cards from hand, display, or a combination.
- Play animals one after the other.
- Do not replenish the display until the turn is finished.
- Increase Reputation:
- Increase zoo reputation by 1 if action strength is at least 5.
- Increase reputation at the start of the action.
- Icon Condition:
- Can play animals that have the specific icon condition after upgrading the Animals action.
Association Action
Perform exactly one association task

- Performing Association Tasks:
- Requires 1 active association worker from your zoo map.
- Place the worker on the Association board task.
- If the task already has your worker(s):
- 1 worker: Place 2 workers to perform the task.
- 2 workers: Cannot perform the task again for now.
- Workers of other colors do not affect your tasks.
- Workers return to your zoo map and become active again during breaks.
- Action Strength:
- Each task has a required action strength.
- Can only perform tasks if action strength meets or exceeds the task’s value.
- Tasks:
- Increase Reputation:
- Increase zoo reputation by 2.
- Advance the Reputation counter and receive any applicable bonuses.
- Gain Partner Zoo:
- Take a partner zoo from the board and place it on the lowest empty space on your zoo map.
- Receive a bonus if available.
- Maximum 4 partner zoos, each from different continents.
- Requires upgrading Association action to take the third and fourth partner zoo.
- Partner zoos reduce animal card costs by 3 money per continent icon and provide icons for other effects.
- Gain Partner University:
- Take a university from the board and place it on the lowest available space on your zoo map.
- Receive a bonus if available.
- Advances Reputation counter if depicted on the university.
- Universities increase reputation, grant research icons, and increase hand limit to 5 cards.
- Increase Reputation:
- Conservation project work:
- Supporting Conservation Projects:
- Existing Projects: Support a project already in play.
- New Projects: Play a Conservation Project card from your hand and support it immediately.
- Placing New Conservation Projects:
- Place the card above the Association board on the leftmost space.
- Shift existing Conservation Project cards to the right.
- Maximum cards above the board depend on player count (2, 3, or 4).
- Discard the rightmost card if there are too many, returning player tokens on it to the supply.
- Base Conservation Projects:
- Remain below the Association board and are never moved.
- No new base projects are added during the game.
- Supporting a Conservation Project:
- Fulfill a condition depicted on the card without a player token on it.
- Support each project only once.
- Place a player token from the left side of your zoo map on the fulfilled condition.
- Rewards:
- Advance your Conservation counter and, if applicable, Reputation counter as per the card’s award.
- Activate and gain the corresponding bonus from the zoo map immediately.
- Some bonuses are gained again during each break.
- Conditions:
- Choose which condition to fulfill if multiple are possible.
- Supporting Conservation Projects:
- Replenishment During Breaks:
- Partner zoos and universities on the Association board are replenished during breaks.
Perform one or more different association tasks. You may make one donation.

- Multiple Association Tasks:
- Perform several different association tasks with one action.
- Each task requires 1 or 2 association workers.
- Total value of tasks must not exceed action strength (can be less).
- Supporting New Conservation Projects:
- Play Conservation Project cards directly from the display if within reputation range.
- Pay additional cost equal to the folder number.
- Do not replenish the display until the turn is complete.
- Donations:
- Allowed to make exactly 1 donation to an animal welfare program per Association action.
- Pay the smallest visible amount in the “donation” area to the general supply.
- Cover the corresponding space with a player token and gain 1 conservation point.
- Subsequent donations cost 12 money if all spaces but the last one are occupied.
- Must perform at least 1 association task to make a donation (no worker needed for donation).
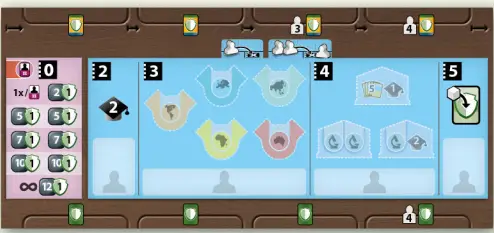
The Association Board
- Association Board Areas:
- Blue Area: Tasks to perform using association workers.
- Without upgrade: Perform exactly 1 task.
- Pink Area: Gain additional conservation project points by donating to animal conservation organizations.
- Requires upgrading the Association action card.
- Blue Area: Tasks to perform using association workers.
- Conservation Projects:
- Spaces for conservation projects located above and below the Association board.
- Support these projects during the game
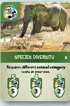
Conservation Projects Layouts
- Types of Conservation Projects:
- Icon-Based Projects:
- Require a certain number of specific icons in your zoo (e.g., Reptiles).
- Count icons on Animal and Sponsor cards, partner zoos, and universities.
- Release into the Wild Projects:
- Discard 1 Animal card with a specific icon from your zoo.
- The animal must require a standard enclosure of the depicted size.
- Move Appeal counter back as indicated on the Animal card.
- Remove player tokens from special enclosures or flip the smallest occupied standard enclosure.
- Icon-Based Projects:
- Card Details:
- Conditions (1): Fulfill any of the three conditions depicted.
- Rewards (2): Receive the corresponding rewards for fulfilling conditions.
- Additional Bonus (3): Some cards grant a bonus to the player who plays them.
Sponsors Action

Play exactly 1 Sponsor card OR advance the Break token and take money.
- Playing a Sponsor Card:
- Play exactly 1 Sponsor card from your hand.
- Action strength must be at least equal to the Sponsor card’s level.
- Fulfill any conditions on the left side of the card.
- Execute the instant effect and/or recurring effect if applicable.
- Place the card next to your zoo map.
- Advancing the Break Token:
- Advance the Break token a number of steps.
- Take money for each step advanced.
- Receive the full amount of money even if the Break token reaches the final space early.
Play one or more Sponsor cards OR advance the Break token and take money

- Playing Multiple Sponsor Cards:
- Play multiple Sponsor cards with one action.
- Action strength plus 1 must be at least the sum of the levels of all played cards.
- Use X-tokens to increase action strength beyond 5.
- Play cards one after the other, executing all instant effects of one card before playing the next.
- Playing Sponsor Cards from Display:
- Can play Sponsor cards from the display or your hand.
- Display cards must be within your reputation range.
- Pay an additional cost equal to the folder number of the display card.
- Do not replenish the display until the turn is complete.
- Advancing the Break Token:
- If using the Sponsors action to advance the Break token, take money twice.
- Additional Capability:
- Can play Sponsor cards that have the specific icon as a condition after upgrading.
Sponsor Card Layout
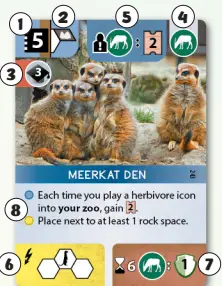
- Card Level:
- The level is shown in the upper-left corner (1).
- Building Requirements:
- If a special building must be placed next to water or rocks, this requirement is indicated next to the level (2).
- Conditions:
- Conditions to play the card are shown on the left side (3).
- Icons Provided:
- Icons provided by the card are depicted in the upper-right corner (4).
- Card Effects:
- Recurring Effects: Shown at the top on a blue background, or purple if they provide income during breaks (5).
- One-Off Effects: Indicated by a yellow background in the lower-left corner (6).
- Final Scoring Effects: Indicated by a brown background in the lower-right corner; a vertical brown strip behind the card level serves as a reminder (7).
- Effect References:
- Icons on the card itself count for its effects or triggering them, except for rock and water icons in the upper-left corner (8).
X-Token Action
Take 1 X-Token

- When to Use:
- If you cannot or do not want to perform any of the 5 main actions.
- How to Perform:
- Use any Action card.
- The action is independent of the card’s slot value.
- Cannot use X-tokens to increase action strength.
- Select an Action card, move it to slot 1, and shift intervening cards to the right.
- Take 1 X-token.
- Limitations:
- Cannot perform this action if you already have 5 X-tokens.
Appeal and Conservation Points
- Zoo Appeal:
- Determines how much money you earn during each break.
- Conservation Track:
- Provides immediate one-time effects when reaching or passing certain spaces.
- Conservation Points Milestones:
- 2 Conservation Points:
- Either upgrade one Action card (flip it over) or activate an additional association worker (move a lying down worker to the notepad).
- 5 / 8 Conservation Points:
- Choose either 5 money or a bonus token next to this space.
- Execute the effect immediately.
- If bonus tokens are gone, the option to take 5 money remains.
- 10 Conservation Points:
- The first player to reach/exceed 10 points triggers all players to choose and discard one Final Scoring card.
- Discard facedown under the pile of remaining Final Scoring cards.
- If no player reaches 10 points before the game ends, discard a Final Scoring card before end game scoring begins.
- 2 Conservation Points:
Break
- Triggering a Break:
- Occurs when the Break token reaches the last space of the Break track, triggered by an Action card, Sponsor card, or Animal card effect.
- Complete your current turn, then all players perform the break steps.
- Break Steps:
- Hand Card Limit:
- Discard surplus cards to the discard pile if you exceed your hand limit (normally 3 cards, 5 with a specific university).
- Tokens on Action Cards:
- Return Multiplier, Venom, and Constriction tokens to the supply.
- Association Board:
- Return all association workers to the notepad on your zoo map.
- Replenish the display of partner zoos and universities (ensure one of each is available, no need to replenish those all players already have).
- Replenish Display:
- Discard the two bottom cards (folders 1 and 2) from the display.
- Move remaining cards down and replenish the display.
- Take Income:
- Collect income simultaneously or in player order if needed.
- Income Steps: a. Zoo Appeal: Take money based on your position on the Appeal track. b. Kiosks: Collect 1 money for each unique building, special enclosure, occupied standard enclosure, and pavilion adjacent to each kiosk. c. Income Icons: Collect income from Sponsor cards and activated bonuses on your zoo map.
- Break Track:
- Return the Break token to the starting space for your player count.
- Hand Card Limit:
- Resuming Play:
- The break ends, and the game continues with the next player in clockwise order taking their turn.
End of Game and Scoring
- Game End Trigger:
- The game ends if, at the end of a turn or during a break, your Conservation counter and Appeal counter are in the same scoring area or have passed one another.
- A scoring area includes one space of the Conservation track and the adjacent spaces of the Appeal track.
- If triggered at the end of your turn, all other players take one more turn.
- If triggered during a break, all players, including you, take one more turn.
- Score Cards:
- At the end of the game, calculate conservation points or appeal from Final Scoring cards and cards with end-of-game icons.
- If no player reached 10 conservation points, all players discard one Final Scoring card before adding points.
- Determine Victory Points:
- Locate the scoring area of your Conservation counter and find the lowest appeal value in that area (your Target Number).
- Subtract your Target Number from your appeal value to get your Victory Points.
- The player with the highest positive Victory Point total wins.
- Tiebreakers:
- Player who supported the most Conservation Projects (count player tokens removed from the left side of the zoo map).
- If still tied, all tied players share the victory.
Solo Play
Setup
- Conservation Project Cards:
- Lay out 3 basic Conservation Project cards.
- Do not place any tokens of a different color on them (set up like a 3-player game).
- Break Token:
- Do not use the Break token.
- Place 7 player tokens of any unused color on the spaces in the left column of the solo tile (A).
- Starting Appeal:
- Start the game with 20 appeal.
Turn / Cards
- Interactive Effects:
- Cards with interactive effects have a blue stripe at the bottom with the solo effect icon.
- The blue stripe contents replace the interactive effect with a solo effect.
- Found on 1 Final Scoring card and several Animal cards.
- Conservation Projects:
- Up to 2 Conservation Project cards can be placed above the Association board.
- Break Token and Money:
- No Break token is used.
- Actions that would advance the Break token do not advance it.
- You still receive money for actions that would normally move the Break token.
- No X-token is awarded for triggering a break.
- Examples:
- Cougar (Jump 3): Take 3 money, even though there is no Break token to advance.
- Upgraded Sponsors Action (Strength 4): Take 8 money for the break ability, even though there is no Break token to advance.
Gameplay / Breaks
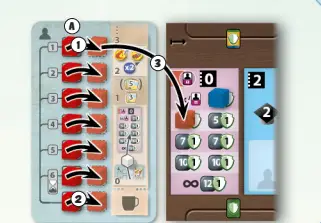
- End of Turn:
- Move the topmost player token from the left column of the solo tile to the right column (1).
- Triggering a Break:
- When the last token is moved to the right column (revealing the break icon), resolve a break (2).
- At the beginning of the break:
- Place the topmost player token onto the open donation space with the smallest number on the Association board (3).
- If all spaces except space 12 are occupied, place the token next to space 12.
- Move remaining tokens back to the left column of the solo tile, leaving one more row empty.
- Break Steps:
- Perform all break steps except for step 6 (returning the Break token).
- End of Game:
- The game ends after 6 rounds when only 2 tokens are left on the solo tile and the bottom one is moved to the right.
- Do not trigger another break; proceed to final scoring.
- Winning the Solo Game:
- Achieve at least 0 Victory Points after final scoring (Appeal and Conservation counters in the same scoring area or passed each other) to win.