How to play Cascadia if you hate reading rulebooks
I hate reading rulebooks! This how to play Cascadia is a condensed version of the rulebook to help you get started fast.
Check out our Cascadia game overview page to discover if it is the right game for you.
Cascadia Game Setup
Wildlife Tokens: Place all in the Cloth Bag, shuffle well.
Habitat Tiles:
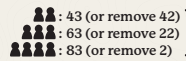
- Determine number of tiles based on players
- 2 players: 43
- 3 players 63
- 4 players 83
- Randomly select tiles without looking.
- Shuffle and stack face down within reach.
- Excluded tiles go back in the box.
Wildlife Scoring Cards:
- Randomly select 1 card for each of the 5 wildlife.
- Place these 5 cards in the center, visible to all players.
- Use ‘A’ cards for the first game.
- Return unused cards to the box.
Starter Habitat Tiles:
- Randomly distribute 1 to each player, face-up.
- Return unused starter tiles to the box.
Initial Habitat Tiles and Tokens:
- Reveal 4 Habitat Tiles and place them face-up in the center.
- Draw 4 Wildlife Tokens from the bag, pair each with a Habitat Tile.
Nature Tokens: Place within reach of all players.First Player:
- The player who most recently saw one of the wildlife in the game.
- Alternatively, select randomly.
Cascadia Gameplay
Overview
- Turn Order:
- Start with the first player, proceed clockwise.
- Player Actions:
- Draft a Habitat Tile and Wildlife Token combination.
- Add them to their environment (all tiles and tokens in front of the player, including the Starter Habitat Tile).
- End of Turn:
- Replace the selected Habitat Tile and Wildlife Token with new ones from the stacks and Cloth Bag.
- Game End:
- The game ends when no more Habitat Tiles are available.
- Each player plays exactly 20 turns.
- Final Scoring:
- Score points, and the player with the most points wins.
Cascadia Turn Actions
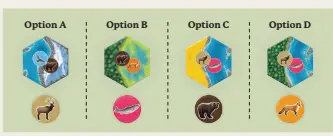
Select a Habitat Tile and Wildlife Token
- At the start, there will be 4 Habitat Tiles and 4 Wildlife Tokens in 4 distinct combinations.
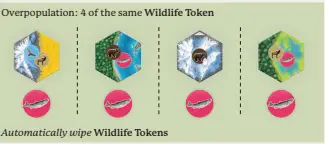
- Check for overpopulation:
- If all 4 Wildlife Tokens are the same, wipe and replace all 4.
- If 3 Wildlife Tokens are the same, optionally wipe and replace those 3.
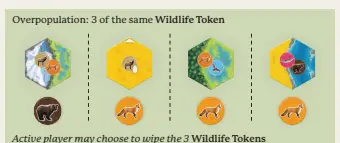
- Place wiped tokens back into the Cloth Bag.
- Select one Habitat Tile + Wildlife Token combination.
- Optionally spend a Nature Token to:
- Take any Habitat Tile and any Wildlife Token.
- Wipe any number of Wildlife Tokens and replace them.
- Spent Nature Tokens are returned to the supply.
Place the Tile and Token into Your Environment
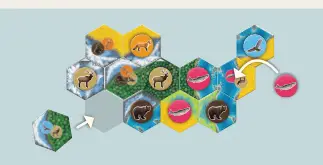
- Habitat Tile placement rules:
- Must be adjacent to any existing Habitat Tile.
- Cannot be placed on top of another tile or move existing tiles.
- Wildlife Token placement rules:
- Must be placed on a tile without an existing Wildlife Token.
- Tile must show the matching wildlife.
- If unable to place, return the token to the Cloth Bag.
- Can place on the current turn’s tile or any other available tile.
- Placing on a Keystone Tile grants a Nature Token.
- Replace Selected Tile and Token
- Replace Habitat Tile from the face-down stack.
- Replace Wildlife Token from the Cloth Bag.
- Do not move existing tiles and tokens; refill empty spots.
- End of Turn:
- Turn completes, play passes clockwise.
Tile Overview:
- Habitat Tiles have 1-2 terrain types and 1-3 Wildlife Token options.
- Spending Nature Tokens allows special actions (take any tile/token or wipe tokens).
- Unused Nature Tokens are worth 1 point each at game end.
- Must be adjacent to any existing Habitat Tile.
- Cannot be placed on top of another tile or move existing tiles.

Cascadia End Game & Scoring
Game End:
- Ends immediately if no face-down Habitat Tiles remain.
- Each player plays exactly 20 turns.
- Record scores on the Scorepad for:
- Wildlife Scoring Cards
- Habitat Tile Corridors
- Habitat Tile Corridor Majorities
- Nature Tokens
Scoring Categories:
- Wildlife Scoring Cards:
- Score each wildlife based on the used Scoring Cards.
- Habitat Tile Corridors:
- Score 1 point per tile in the largest contiguous habitat corridor for each of the 5 habitats (Mountains, Forests, Prairies, Wetlands, Rivers).
- Tiles must share at least one matching edge.
- If you have groups of 3 and 4 Forests, score 4 points for the largest group.
- Habitat Tile Corridor Majorities:
- Score bonus points for the largest contiguous habitat corridor for each habitat type, based on player count.
- Use recorded scores from step 2 to determine bonus points.
- Solo Game:
- 2 point bonus for each habitat type with a group size of 7 or more.
- 2-Player Game:
- 2 point bonus for the player with the largest habitat corridor in each habitat type.
- If tied, 1 bonus point each.
- No bonus points for the second largest.
- 3/4-Player Game:
- 3 point bonus for the player with the largest habitat corridor in each habitat type.
- 1 point bonus for the second largest.
- If two players tie for the largest, 2 points each; no points for the next largest.
- If three or four players tie for the largest, 1 point each; no points for the next largest.
- Any ties for the second largest, 0 points each.
- Nature Tokens:
- Each unused Nature Token is worth 1 point.
Final Steps:
- Tally scores using the above categories.
- Player with the most points wins.
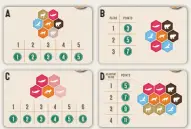
Wildlife Scoring Cards
Bears
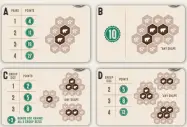
- Score for creating specific groups of bears.
- Groups must be the exact number shown on the card and not adjacent to each other.
- Card clarifications:
- (A) Increasing points for total number of bear pairs.
- (B) 10 points for each group of exactly three bears.
- (C) Points for groups of 1-3 bears; bonus for having one of each size.
- (D) Points for groups of 2-4 bears.
Elk
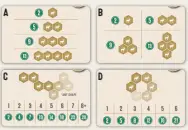
- Score for creating groups of elk in specific shapes/formations.
- Elk groups can be adjacent, but each elk scores only once.
- Score groups to maximize points.
- Card clarifications:
- (A) Points for straight lines (connected flat side to flat side).
- (B) Points for exact shapes shown.
- (C) Points for contiguous groups of any shape/size, increasing with size.
- (D) Points for groups in circular formations.
Salmon

- Score for creating runs of salmon (adjacent, no more than two other salmon).
- Runs cannot have adjacent salmon.
- Card clarifications:
- (A) Points for runs based on size, up to 7.
- (B) Points for runs based on size, up to 5.
- (C) Points for runs based on size, between 3 and 5.
- (D) Points for each salmon in the run plus each adjacent animal token.
Hawks
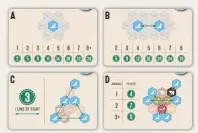
- Score for spreading hawks out over the landscape.
- Score individually, in pairs, or for lines of sight.
- Card clarifications:
- (A) Points for each hawk not adjacent to another hawk.
- (B) Points for each hawk not adjacent to another hawk and with a direct line of sight to another hawk.
- (C) 3 points for each line of sight between two hawks.
- (D) Points for each pair of hawks based on the number of unique animal types between them (excluding other hawks).
Foxes
- Score for adjacencies to other animals.
- Score individually or in pairs, based on conditions in adjacent habitat spaces.
- Card clarifications:
- (A) Points for each fox based on the number of unique animal types directly adjacent.
- (B) Points for each fox based on the number of unique animal pairs directly adjacent.
- (C) Points for each fox based on the most abundant adjacent animal type.
- (D) Points for each fox pair based on the number of unique animal pairs directly adjacent.
Cascadia Solo Mode
Setup:
- Follow the 2-player setup with exceptions:
- Only you get a Starter Habitat Tile.
- Place Habitat Tile stacks on the left side of the play area.
Turn Summary:
- Follow usual turn steps.
- Before replacing the Habitat Tile and Wildlife Token:
- Discard the tile and token furthest from the draw stacks.
- Slide the remaining two tiles and two tokens away from the draw stacks.
- Remove the discarded tile and token from the game.
- Draw two new Habitat Tiles and two new Wildlife Tokens and place them in the display.
Turn Example:
- Spend a Nature Token to take the Keystone Tile and matching Elk Wildlife Token.
- Place the tile and token in your environment.
- Discard the tile and token furthest from the draw stacks (e.g., Mountains-Wetlands tile and Bear token).
End Game & Scoring:
- The game ends the same as in multiplayer (exactly 20 turns).
- Follow the End Game & Scoring process.
- Compare your score using the provided chart for single games.