How to play Dune Imperium Uprising if you hate rulebooks
I hate rulebooks! This condensed How to Play Dune Imperium Uprising rules help players get the essential instructions without having to trawl rulebooks
Game Components
- Player Components:
- 3 agents per player.
- Control markers, combat markers, and spies.
- A 10-card starting deck, which includes Convincing Argument, Dagger, Diplomacy, Dune, Reconnaissance, Seek Allies, and Signet Ring cards.
- 16 cubes, 2 discs, a score marker, and a councilor token.
- Tokens and Resources:
- Spice tokens: 7 large (worth 5), 20 small (worth 1).
- Water tokens: 20 tokens.
- Decks:
- 69 Imperium Deck cards.
- 18 Reserve cards, including “Prepare the Way” and “The Spice Must Flow.”
- 44 Intrigue cards.
- 16 Conflict cards (in three stages: Conflict I, II, and III).
- 5 Objective cards.
- Leaders and Board:
- 9 leader cards (two-sided, with special abilities).
- A two-sided game board for placement.
- Board space guide sheet for clarifications.
- Other Components:
- Sandworms (4 plastic and 4 wooden pieces).
- Alliance tokens (4 pieces).
- First Player marker.
- CHOAM Module Components (for expansion):
- Additional cards, tokens, and rules for advanced gameplay.
Setup
Game Board:
- Place the game board in the center.
- Set the Shield Wall token on the designated area below the Spice Refinery.
Faction Tokens:
- Place the four Alliance tokens on the influence tracks for Emperor, Spacing Guild, Bene Gesserit, and Fremen.
Player Setup:
- Each player selects or randomly draws a Leader.
- Players take their corresponding components: a 10-card starting deck, 2 discs, 3 agents, and other tokens (spies, control markers, and combat markers).
- Place one disc on the score track and another on the combat track.
- Place cubes on the bottom of each faction’s influence track.
Conflict Deck:
- Separate the Conflict cards into Conflict I, II, and III.
- Shuffle the Conflict III cards and place them face down on the game board.
- Shuffle the Conflict II cards, deal five on top of the Conflict III deck.
- Shuffle the Conflict I cards, place one on top of the Conflict II stack.
Intrigue and Imperium Decks:
- Shuffle and place the Intrigue Deck face down.
- Shuffle the Imperium Deck, and deal five cards face up in a row (the Imperium Row).
- Set aside the Reserve Deck for “Prepare the Way” and “The Spice Must Flow” cards.
Final Steps:
- Each player draws an Objective card and the one marked with the First Player token gets the marker.
- Players receive 1 water token and set up their remaining tokens in their supply.
- Create a bank next to the board with remaining tokens and resources (Solari, spice, water, and sandworms).
Game Overview and Key Concepts
Objective:
- Players act as Leaders of Great Houses or powerful figures in the Imperium, competing for control through combat, political influence, and alliances.
- Victory is determined by Victory Points (VPs). The game ends when any player reaches 10 VPs or when the Conflict Deck is exhausted. The player with the most VPs wins.
Leaders:
- Each Leader has two unique abilities:
- The first ability is used during play.
- The second ability, activated by the Signet Ring card, is used on an Agent turn.
Deck-Building:
- Players start with a 10-card deck, which is identical for all players.
- During the game, players can acquire new cards to customize their deck. Cards are added to the discard pile when acquired, reshuffled into the deck when needed.
- Weaker cards can be trashed to improve the chances of drawing stronger cards.
Agents:
- Players begin with two Agents and can acquire a third (the Swordmaster) during gameplay.
- Agents are placed on board spaces to gather resources or advance strategies. Agents can only be placed on spaces that match the icons on a card played.
- Board spaces and card effects are resolved during an Agent turn.
Factions:
- There are four Factions in the game: Emperor, Spacing Guild, Bene Gesserit, and Fremen. Players move up the Influence Track by sending Agents to these Factions’ spaces or by card effects.
- At 2 Influence, players gain 1 VP. At 4 Influence, players earn a Faction bonus.
- The first player to reach 4 Influence also gains the Alliance Token, which provides an additional VP. This token can be stolen by an opponent who surpasses their Influence.
Intrigue Cards:
- Intrigue Cards represent secret strategies and can be played to gain resources, influence, or even VPs.
- There are three types of Intrigue Cards:
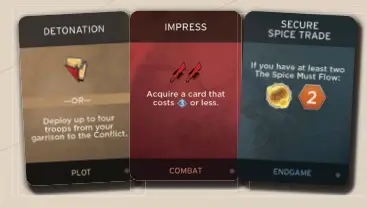
- Plot cards: Played during Agent or Reveal turns.
- Combat cards: Played during the Combat Phase.
- Endgame cards: Played at the end of the game.
Gameplay
Phase 1: Round Start:
- Reveal a Conflict card from the Conflict Deck that outlines the rewards players will compete for during the round’s combat phase.
- Each player draws five cards from their deck, forming their hand for the round.


Phase 2: Player Turns:
- Players take turns clockwise, either performing an Agent Turn or a Reveal Turn.
- Agent Turn: Play a card and send an Agent to a board space to resolve the effects of both the card and the space.
- Reveal Turn: Once all Agents are placed or a player chooses not to place any more, they reveal remaining cards, resolve Reveal effects, and acquire new cards using Persuasion.
- Players continue taking turns until all players have completed a Reveal Turn.
Agent Turn
Play a Card:
- On an Agent Turn, play one card from your hand. The card must have an Agent icon that matches the board space where you plan to send your Agent.
- If a card has no Agent icons, it cannot be played during an Agent turn.
Place an Agent:
- Send an Agent to an unoccupied board space that matches the Agent icon on the card.
- You cannot place an Agent on a space already occupied by another player’s Agent unless using specific abilities (e.g., Spies).
Resolve Card and Board Effects:
- When placing an Agent, resolve both the effects of the board space and the Agent box of the card you played. These effects can be resolved in any order.
- Some board spaces have costs that must be paid (e.g., Solari, spice, or water) before gaining the effects.
Influence Factions:
- If the board space belongs to one of the Factions (Emperor, Spacing Guild, Bene Gesserit, Fremen), move your cube one space up on that Faction’s Influence track.
- Certain spaces may require a minimum level of influence to access.
Infiltration (Spies):
- If using a Spy ability, you may bypass the rule of occupying an already-used board space by recalling a Spy.

Units and Conflict
Types of Units:
- There are two types of units used in conflicts:
- Troops: Recruited during the game, they start in your garrison and are deployed to the conflict.
- Sandworms: Powerful units that can only be summoned with a Maker Hooks token and are limited by certain conditions (e.g., the Shield Wall).
Recruiting Troops:
- Players can recruit troops by playing cards or using board spaces that show the troop icon.
- Troops are placed in the player’s garrison but must be deployed to the conflict to participate in combat.
Deploying Units:
- Units can be deployed to the Conflict area when you send an Agent to a Combat space (spaces marked with crossed swords).
- You may deploy any troops gained that turn plus up to two troops from your garrison to the conflict.
Combat Strength:
- Each troop is worth 2 strength, while each sandworm is worth 3 strength.
- Players can also gain strength from cards played during the Reveal Turn (swords provide additional strength).
Sandworm Restrictions:
- Sandworms cannot be summoned to conflicts protected by the Shield Wall unless the Shield Wall is destroyed during play.
- To summon a sandworm, you must have a Maker Hooks token.
Control Markers:
- If you win a conflict over a key location (Arrakeen, Spice Refinery, Imperial Basin), place your Control marker on that location’s flag. This grants bonuses when anyone sends an Agent to that location.
Critical Locations and the Shield Wall
Critical Locations:
- Three key locations on the planet Dune are Arrakeen, Spice Refinery, and Imperial Basin.
- These locations are often the focus of Conflict cards, and winning a conflict here allows you to place a Control marker on the location’s flag.
Control Markers:
- When you place a Control marker on a critical location, you gain a bonus whenever any player (including yourself) sends an Agent to that location:
- Arrakeen and Spice Refinery provide 1 Solari.
- Imperial Basin provides 1 spice.
- If a Conflict card for a location you control is revealed, you receive a defensive bonus, allowing you to deploy one troop from your supply to the conflict.
The Shield Wall:
- The Shield Wall is a protective barrier that guards these three critical locations from sandworms.
- As long as the Shield Wall token is in place, no sandworms can be summoned to conflicts at these locations.
Destroying the Shield Wall:
- Some cards or board spaces allow players to destroy the Shield Wall by removing its token from the board. This opens up the possibility of summoning sandworms to conflicts at these locations.
Spies
Placing Spies:
- Spies are placed on observation posts on the board when a card or board space with the Spy icon is played.
- If you don’t have any Spies available, you may first recall a Spy from the board without effect to place it elsewhere.
Spy Abilities:
- Spies allow two special abilities:
- Infiltrate: A Spy allows you to send an Agent to a board space already occupied by another player’s Agent, bypassing the usual restriction.
- Gather Intelligence: When you send an Agent to a board space, you may recall a Spy from a connected observation post to draw a card.
Spy Placement Conditions:
- Some Spy effects may limit where Spies can be placed, such as specifying a connected Agent icon or board space.
- Spies remain in observation posts until recalled.
Spy Recall:
- Spies can be recalled for either Infiltrate or Gather Intelligence abilities, but not both in the same action.
Reveal Turn
Reveal Cards:
- Reveal all remaining cards in your hand and place them face up in front of you. These cards are kept separate from those used during Agent turns.
Resolve Reveal Effects:
- Resolve the Reveal effects on the cards you revealed. These effects include gaining resources like Persuasion (for acquiring cards) and Swords (for increasing combat strength).
- You can resolve these effects in any order you prefer.
Acquiring New Cards:
- Use the Persuasion you’ve gained during the Reveal turn to acquire new cards from the Imperium Row or from the Reserve.
- The cost of each card is shown in the top-right corner, and you can acquire as many as your Persuasion allows.
- Acquired cards go into your discard pile and will be shuffled into your deck when needed.
Setting Combat Strength:
- After revealing cards, calculate your total combat strength by adding the value of any Swords from your revealed cards to the strength of your deployed units (troops and sandworms).
- Move your Combat marker to reflect your total strength on the Combat track.
Clean Up:
- After resolving all effects, discard all cards you played during the Agent and Reveal turns into your discard pile.
Acquiring Cards
Using Persuasion:
- Persuasion is used to acquire new cards during your Reveal turn. Persuasion is mainly gained from the Reveal effects of the cards you played.
- You can use Persuasion to acquire cards from the Imperium Row (five face-up cards) or the Reserve (specific cards like “Prepare the Way” and “The Spice Must Flow”).
Card Costs:
- Each card has a Persuasion cost shown in the top-right corner.
- You may acquire as many cards as you can afford with the Persuasion you have gained in the round.
Acquiring Multiple Cards:
- You can acquire multiple cards, and you can combine Persuasion from different cards to meet the cost of any card you want to acquire.
- If you acquire one card from the Imperium Row, it is immediately replaced with a new card from the Imperium Deck, allowing you to acquire the new card if you have enough Persuasion.
Discarding Acquired Cards:
- Newly acquired cards go into your discard pile and will be shuffled into your deck when needed. You do not use newly acquired cards immediately.
Persuasion Limits:
- Any Persuasion you don’t spend during your Reveal turn is lost and cannot be carried over to the next round.
Phase 3: Combat
- Players with units in the Conflict can play Combat Intrigue cards.
- Resolve the Conflict based on each player’s strength (from units and swords on cards).
- Rewards are given according to the strength order (highest strength wins the top reward).
Combat Intrigue Cards:
- Starting with the player holding the First Player marker and moving clockwise, each player with units in the Conflict may play any number of Combat Intrigue cards or choose to pass.
- Players who passed can still choose to play Combat Intrigue cards later in the phase, as long as no player has resolved the combat yet.
Resolving Combat:
- Once all players pass consecutively, the combat is resolved based on the total strength of each player’s units and revealed cards.
- Players with the highest strength win the combat and claim the top reward shown on the Conflict card.
- The second-place player (and third-place, in games with four or more players) receives the second reward. Players with 0 strength get no rewards.
Claiming the Conflict Card:
- The player who wins the combat also claims the Conflict card, which may provide additional strategic advantages in future rounds.
Returning Units:
- After the combat is resolved, all units involved in the conflict (troops and sandworms) are returned to the players’ supply (not the garrison).
- Reset all Combat markers on the Combat track to 0.
Special Conditions:
- Some Conflict cards or combat results may trigger special effects, such as matching battle icons for additional Victory Points or sandworm reward doubling, which doubles certain rewards if a sandworm was involved in the combat.
Phase 4: Makers
- Add spice to unoccupied board spaces that have a Maker icon.
Adding Spice:
- Check each board space that has a Maker icon (e.g., Deep Desert, Hagga Basin, and Imperial Basin).
- If a board space with a Maker icon does not have an Agent placed on it, add 1 spice from the bank to that space.
- The spice accumulates on the space each round it is unoccupied, increasing its value for future rounds.
Collecting Spice:
- When a player later sends an Agent to a space with accumulated spice, they collect all the bonus spice on that space in addition to the regular benefits of the board space.
Phase 5: Recall
- Recalling Agents:
- All players recall their Agents from the board and return them to their Leader. These Agents will be available for use in the next round.
- Passing the First Player Marker:
- The First Player marker is passed clockwise to the next player, giving them the first action in the upcoming round.
- Preparing for the Next Round:
- Once all Agents are recalled and the First Player marker is passed, the next round begins with Phase 1: Round Start.
This phase resets the game state, allowing players to start fresh with new actions in the next round
CHOAM Module
DUNE: IMPERIUM — UPRISING comes with a mini-expansion called the CHOAM Module. It is recommended that the CHOAM Module is used only when one is familiar with the game.
Setup:
- Contracts: Shuffle the 20 contract tokens and place two face-up on the board beneath the Landsraad Council. The remaining contracts are placed face down in the bank.
- Add the four additional Intrigue cards and four additional Imperium cards to their respective decks.
- Shaddam Corrino IV can be chosen as a Leader in games using the CHOAM Module.
Taking Contracts:
- Instead of gaining 2 Solari when a contract icon appears, players can take one of the two face-up contracts from the board.
- When a contract is taken, replace it with another from the face-down stack. If no contracts remain, the icon provides 2 Solari.
Completing Contracts:
- Contracts are completed by sending an Agent to a specified board space or meeting specific conditions:
- Location-based contracts: Complete by sending an Agent to the board space listed on the contract.
- Harvest contracts: Completed by sending an Agent to a Maker board space and gaining the required amount of spice.
- Immediate contracts: Completed as soon as they are taken.
- Acquire contracts: Completed by acquiring “The Spice Must Flow” card.
Gaining Rewards:
- Once a contract is completed, the player announces it, gains the listed rewards, and flips the contract face down. Some cards and effects may refer to completed contracts later in the game.
Combining with Expansions:
- The CHOAM Module can be combined with other expansions like Rise of Ix, which adds further complexity to contract acquisition and completion.