Tales from the Red Dragon Inn – Chapter 1 Scenario Book Summary
Summary of the Chapter 1 Scenario book provides a condensed reading version to help you get straight to playing quickly. This section works hand in hand with the chapter 1 walkthrough, which we have also condensed in bullet point form.
Spoiler Alert! Jumping to this book ahead of other chapters will result in SPOILERS!
Other Tales from the Red Dragon Inn Resources:
Chapter 1 Walkthrough Summary
Reference Manual
Chapter 1 Scenario Book Summary
Chapter 2 Scenario Book Summary
Chapter 3 Scenario Book Summary
Chapter 4 Scenario Book Summary
Chapter 5 Scenario Book Summary
Our overview page of Tales from the Red Dragon Inn explains what the game is about and shares reviews and videos on the web.
Scenario 1
Prologue
Late at night at the Red Dragon Inn, most guests are leaving or heading to their rooms. Warthorn Redbeard, the inn’s proprietor, counts the day’s earnings upstairs. Your adventurer group remains at your table; some members are passed out, while others, like Wrench and Wizgille, are working off their tabs by fetching drinks from the cellar. Fiona, Zot, and Gerki are still gambling.
Gerki raises the bet, and Zot tries to distract him but fails. Suddenly, Wizgille and Wrench rush in, frantic about a problem with the Danger Room they built in the cellar. A tremor shakes the inn, and smoke erupts from the cellar. They explain the Danger Room, meant for training adventurers, has malfunctioned and is powering up uncontrollably.
As strange noises come from the cellar, Wizgille calculates they have mere seconds before the constructs activate. Pooky dashes downstairs, and Zot readies for action, urging everyone to keep the constructs contained. The adventurers prepare to face the imminent threat.
Stop Point
When you encounter a Stop Point while reading the Scenario Book, it indicates you need to gather important information such as Objectives, Win Conditions, and Lose Conditions. Always read these sections carefully before proceeding with your game.
Action Required
- Return to the Walkthrough and read the section “Gauntlet Setup“.
Setup
Scenario Map and Epic Pool:
- Place the scenario map in the center of the play area.
- Place the Epic Pool near the scenario map.
Door Tokens:
- Place a door token on each designated door space on the map.
Prepare Schemers:
- Follow the specific instructions in the Scenario Book to prepare the necessary schemers. This typically involves gathering the schemer figures, bases, and tracker cards required for this scenario.

Deploy

Hero Setup
Each player should follow these steps to prepare their Hero for the scenario:
- Choose a Hero:
- Select a Hero from the available options.
- Take the Hero’s figure(s), Hero mat, reminder card(s), and initiative token(s) and place them in front of you.
- Equip Ability and Item Cards:
- Place the two Hero Cards and one Item Card for your Hero near your Hero mat. These will be your equipped ability cards for this scenario.
- Deploy Hero Figures:
- Place your Hero figure(s) on the designated starting spaces on the map as indicated in the Scenario Book.
- Resolve Setup Flags:
- Check your equipped Hero and Item Cards for any Setup Flags.
- Resolve any Setup Flags by taking the necessary actions, such as placing tokens or taking additional cards.
Map Features

Difficult:
- Movement Cost: Entering these spaces costs an additional point of Move.
- Exceptions: This does not affect figures using Leap
;or being Pulled, Pushed, Grabbed, or Placed.
Door:
- Impassable: These spaces are Impassable as long as the door token remains in play.
- Objective Phase: Doors will be removed from the map during the Objective Phase if Objectives are achieved.
- Later Scenarios: Rules for doors may vary in later scenarios.
Impassable:
- Movement and Attacks: These spaces block movement and Attacks.
- Restrictions: No figure may enter these spaces, and tokens may not be placed on these spaces. Line of Fire may not be drawn through these spaces.
Trap:
- Dangerous: Traps will deal damage to figures who Move
<onto or through them. This includes figures who are Pulled, Pushed, Grabbed, or Placed onto them. - Leap
;Exception: Figures may Leap;over Traps without penalty.
Stop Point
Lose Condition: The players lose if any Hero is Defeated.
Objective: Defeat all Gizmoblins in The Gauntlet.
Instructions:
- Playing the Round: Follow the steps listed on the map under “Playing the Round.”
- Objective Phase: If the Objective has been achieved during the Objective Phase, proceed to read “The Maze of Madness” in the Walkthrough.
Reinforce for the Maze of Madness
Remove the door tokens from the blue spaces at the end of The Gauntlet, then deploy the following to the Maze of Madness:

Stop Point
Lose Condition: The players lose if any Hero is Defeated.
Objective: Defeat all Gizmoblins in The Maze of Madness.
Instructions:
- Playing the Round: Continue playing rounds according to the scenario rules.
- Objective Phase: If the Objective has been achieved during the Objective Phase, proceed to read “The Room of DOOM” in the Walkthrough.
Reinforce for the Room of Doom
Remove the door tokens from the lavender spaces at the end of the Maze of Madness, then deploy the following to the Room of DOOM:

Stop Point
Lose Condition: The players lose if any Hero is Defeated.
Win Condition: The players win if either the Sparking Engine has been Defeated OR if the Robogre and all Gizmoblins have been Defeated.
Instructions:
- Playing the Round: Continue playing rounds according to the scenario rules.
- Objective Phase: If the Win Condition has been achieved during the Objective Phase, read the Epilogue. If the players lose, return to the start of the scenario and try again.
Epilogue
After defeating the last of the constructs in the hidden Danger Room, the adventurers survey the damage in the basement of the Red Dragon Inn. Amidst the wreckage, Pooky splashes through ale puddles, and Fiona continues kicking the downed constructs.
Wizgille and Wrench, the inventors behind the Danger Room, express regret over the unintended damage. Their intention was to create a training room to attract more guests. Despite the chaos, they see this as an opportunity to improve their designs.
As the group hears strange bubbling sounds, Warthorn Redbeard, the inn’s proprietor, descends, furious about the destruction. The adventurers explain their plan, but the situation worsens when a section of the basement floor collapses, revealing a swarm of oozing, multi-colored slimes.
Realizing the immediate threat, the adventurers prepare to defend the inn from the encroaching slimes, promising Warthorn they’ll protect his livelihood and fix the damage.
The epilogue sets up the next challenge for the adventurers, combining humor and tension as they brace for another battle to save the Red Dragon Inn.
Stop Point
Read “Finishing Scenario 1” in the Walkthrough.
Rewards
Unlock the following Vault 1-21 from the Vault. New Hero cards go to their Heroes and new Item cards are added to the Armory.
Scenario 2
Prologue
Greyport sits above an ancient Undercity, parts of which are abandoned while others are bustling with their own culture. Fiona and Gerki, familiar with the Undercity, know that many basements in Greyport connect to this subterranean world.
After the incursion of rock-eating slimes, the basement of the Red Dragon Inn now connects to the Undercity. The adventurers, freshly equipped, drive the slimes back down a tunnel they created. Lighting their way with torches or magic, they descend the ale-soaked incline into the depths.
The space below smells of wet earth and ale, with broken barrels still leaking their contents. The area shows signs of old tunnels that have collapsed over time. The most recent cave-in is at the far side of the room, with a wall of loose rubble that could be easily breached to allow even the largest adventurers to pass through.
Stop Point
Read “Setting up Under the Cellar” in the Walkthrough.
Setup
- Place Scenario Map and Epic Pool: Put the scenario map and the Epic Pool in the middle of the play area.
- Create Temporary Walls: Place a two-space-long Gravel Wall on each of the double-wide door spaces, creating three temporary walls on the map.
This setup will prepare the play area for the upcoming scenario, ensuring that the temporary walls create specific challenges and dynamics during gameplay.

Keywords
Berserk: This figure treats all other figures as though they were Foes, including other schemers of this figure’s type.
Immune to Acid: This figure is unaffected by Acid Pools and treats them as though they were Safe spaces.
Immune to Traps: This figure does not trigger Trap tokens and treats them as though they were Safe spaces. Note that Zot’s Wizard Fire tokens are not Traps, so they can still damage a figure with this keyword.
Massive:
- When a Push/Pull X effect targets this figure, that effect is reduced to Push/Pull 1.
- When a Forced Movement effect causes this figure to Move < X, X is reduced to 1.
- This figure is not affected by Grab or Place effects
Deploy
Deploy the following to Under the Cellar

Heroes
Setting up your Hero:
- Choose a Hero: Take that Hero’s figure(s), Hero mat, reminder card(s), and initiative token(s), and place them in front of you.
- Hero Cards: Place your 4 Hero Cards near your Hero mat.
- Item Selection: Choose 1 Major Item and 1 Support Item and place them near your Hero mat.
- Setup Flags: Resolve any Setup Flags on your equipped Hero and Item Cards.
- Power Tree: Claim 1 spot on your Hero’s Power Tree.
- Deploy Hero: Deploy your Hero figure(s) on the map.
Map Features

Acid Pool – Hazard:
- These spaces are Dangerous and deal damage to figures occupying them during the Objective Phase.
- Deal damage to each figure on an Acid Pool space during the Objective Phase.
- These spaces do not cause damage to figures that move through them.
Difficult:
- These spaces cost an additional point of Move < to enter.
- This does not affect a figure using Leap ; or a figure being Pulled, Pushed, Grabbed, or Placed.
Gravel Wall – Special:
- These tokens are Impassable and Destructible.
- Gravel Wall spaces block movement and Attacks. No figure may enter these spaces, and tokens may not be placed on these spaces.
- Gravel Wall spaces may be attacked by Heroic figures. When a Heroic figure uses an Attack, they may treat either space a Gravel Wall occupies as though it were a Foe while resolving the Attack.
- If a Gravel Wall is dealt damage, remove it from the map.
- When a Gravel Wall is removed from the map, revealing a new room for the first time, immediately Reinforce that room.
- Damaging a Gravel Wall will trigger Harm \ effects on the Attack that damaged it.
Trap:
- Traps are Dangerous and will deal damage to figures who Move < onto or through them.
- This includes figures who are Pulled, Pushed, Grabbed, or Placed onto or through them.
- Figures may Leap ; over Traps without penalty.
Hazards:
- Hazards vary throughout the campaign and will have different effects depending on the scenario.
- Acid Pools are a type of Hazard in this scenario. You can move through them without harm, but ending your turn on them will result in damage during the Objective Phase.
- Avoid ending your turn in Acid Pools to prevent taking damage.
Gravel Walls:
- Gravel Walls act as “doors” in this scenario and can be targeted with Attacks.
- Gravel Walls are Impassable and Destructible, blocking movement and Attacks, and preventing token placement.
- You can choose whether or not to include Gravel Walls in a Burst Attack.
- Destroying a Gravel Wall can reveal new enemies in the next room, so be cautious when attacking them.
- If Fiona uses “Power Attack!” on a slime adjacent to a Gravel Wall, the Gravel Wall will also take Splash damage.
- Zot’s Wizard Fire tokens cannot be placed on Gravel Walls, so he cannot use them to destroy these walls.
Stop Point
Lose Condition:
- The players lose if any Hero is Defeated.
Objective:
- Defeat all Slimes OR reveal the Echo Chamber during the Combat Phase.
Instructions:
- Begin the Game:
- Follow the standard game setup and start playing.
- Objective Phase:
- If all Slimes have been Defeated AND the Echo Chamber hasn’t been revealed yet, resolve the Event “Trembling Tunnels Part 1”.
- Combat Phase:
- If the Echo Chamber is revealed during a Combat Phase, skip the Event, pause the current Hero’s turn and continue to the next Reinforce section.
- Read “Combat Phase Reinforcement” in the Walkthrough .
Event: Trembling Tunnels Part 1
Do the following in order:
- Deploy a Slime in each Unoccupied Acid Pool in Under the Cellar.
- Remove both Gravel Walls between Under the Cellar and Echo Chamber.
- Continue to the next Reinforce section.
Key Actions:
- Defeat all Slimes to achieve the primary objective.
- Revealing the Echo Chamber can also complete the objective but be prepared for immediate combat reinforcement.
Strategy Tips:
- Focus on defeating Slimes quickly to avoid the additional challenge of reinforcing enemies.
- Use Heroes’ abilities strategically to manage the positioning and movement of Slimes and Heroes.
- Plan your attacks to avoid unnecessary damage from Acid Pools and maximize your effectiveness against Gravel Walls and Slimes.
Reinforce
Deploy the following to Echo Chamber

Stop Point
Lose Condition:
- The players lose if any Hero is Defeated.
Objective:
- Defeat all Slimes OR reveal the Dripping Passage.
Instructions:
- Continue Playing:
- Follow the game setup and continue playing rounds.
- Objective Phase:
- If all Slimes have been Defeated AND the Dripping Passage hasn’t been revealed yet, resolve the Event “Trembling Tunnels Part 2”.
- Combat Phase:
- If the Dripping Passage is revealed during a Combat Phase, skip the Event, pause the current Hero’s turn and continue to the next Reinforce section.
Event: Trembling Tunnels Part 2
Do the following in order:
- Deploy a Slime in each Unoccupied Acid Pool in Echo Chamber.
- Remove both Gravel Walls between Echo Chamber and Dripping Passage.
- Continue to the next Reinforce section.
Reinforce
Deploy the following to Dripping Passage

New Map Features

Rotten Pillar:
- Properties: Impassable and Destructible.
- Movement and Attack: Blocks movement and attacks. No figure may enter these spaces, nor may tokens be placed on these spaces.
- Attacking Rotten Pillars:
- Any Rotten Pillar that has not yet taken damage (
#) may be attacked by Heroic figures as though it were a Foe. - Place damage directly onto the Rotten Pillar’s space on the map when it takes damage (counts as Harming the Rotten Pillar).
- Any Rotten Pillar that has not yet taken damage (
Damage Mechanism:
- Once a Rotten Pillar space has
#or more damage on it:- Immediately deal damage to the Gelatinous Blob based on the difficulty level according to the following table:
- Damage ignores Toughness Tokens
- Does not trigger Harm effects
- Immediately deal damage to the Gelatinous Blob based on the difficulty level according to the following table:

Strategy:
- Monitor the Gelatinous Blob: Ensure it does not cross into the Dripping Passage by the Objective Phase.
- Focus on Rotten Pillars: Attack Rotten Pillars to accumulate damage and deal damage to the Gelatinous Blob.
- Team Coordination: Work together to manage the positioning and movement of the Gelatinous Blob to avoid it crossing the line.
- Utilize Hero Abilities: Make strategic use of Hero abilities to control battlefield and manage damage on Rotten Pillars effectively.
Key Actions:
- Attack Rotten Pillars to inflict damage on the Gelatinous Blob.
- Prevent the Gelatinous Blob from staying in the Dripping Passage by the end of the Objective Phase.
Stop Point
- Players lose if any Hero is defeated.
- Players lose if, during the Objective Phase, the Gelatinous Blob is in the Dripping Passage (crossing the Escape! Map Feature line).
- Players win if, during the Objective Phase, the Gelatinous Blob is defeated.
- If the Win Condition is achieved, read the Epilogue.
Epilogue
The great slime beast is dead, defeated by swords, sorcery, and possibly stone. After clearing the cavern of remaining spawn, the companions are pleased with their victory and eager for a hot bath and clean clothes. Deirdre wants to burn her slime-covered robes, while Zot, deep in thought and standing in a puddle of slime, strokes his beard. Pooky, perched on Zot’s cap, looks irritated and sniffs the air. Zot questions Fiona and Gerki about slime in the Undercity; they mention it is usually found in dark crawlspaces and abandoned parts. Fiona reassures Zot, confident in their ability to defeat monsters. However, Zot remains uneasy and decides to visit the Collegium, suspecting more is happening. Gerki sarcastically comments on the possibility of a random slime infestation.
Rewards
Unlock Vault 22-25.
Scenario 3 Attack on the Grey Market
Prologue
You find yourself in the Undercity beneath Greyport, walking along a dimly lit path. Few Undercitizens notice you despite Zot’s complaints about his disguise. Fiona explains the need to blend in to gather information about the giant slime, which Zot’s research suggests is an oceanic species. Deirdre questions how it reached Greyport, and Zot fears for the city’s safety. Eve reveals she could have used illusion magic to disguise them, but chose not to conserve power and for amusement. As you approach the Grey Market, Gerki urges everyone to act casual.
The Grey Market is bustling, with a wide array of goods and performers. Your party spreads out to shop and interview inhabitants, discovering the Undercitizens’ fear of outlying areas near the harbor. Reuniting at the Great Bonfire, you share findings over a meal, though Deirdre is wary of the food. Zot mentions reports of other large slimes digging tunnels. Suddenly, the market shakes, and citizens flee as creatures resembling giant crabs with arm cannons invade. A larger, heavily armored crab commands the attack, targeting the market and its people. The party prepares to fight and defend the Undercitizens from the monstrous invaders.
Stop Point
Read “Setting up the Grey Market” in the Walkthrough
Setup
- Place the scenario map and Epic Pool in the middle of the play area.
- Place a door token on each of the 11 door spaces.
- Randomly place a Randomizer Token letter-side-down in each of the four rooms (the buildings) on the map.
- Using the following table, place the indicated amount of damage onto the Grey Market’s damage box.

Prepare the schemers:

Keywords
Immune to Acid:
- This figure is unaffected by Acid Pools and treats them as Safe spaces.
Immune to Traps:
- This figure does not trigger Trap tokens and treats them as Safe spaces.
- Zot’s Wizard Fire tokens are not Traps and can still damage this figure.
Deploy
Deploy to Grey Market
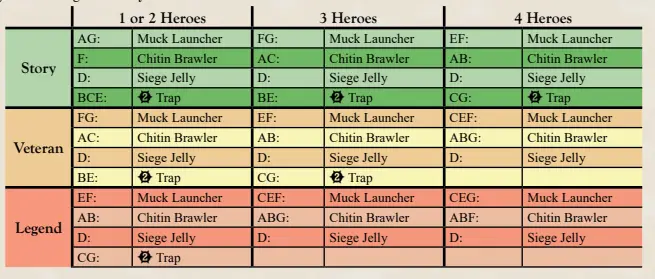
Heroes
For a refresher on Hero Setup, of the Walkthrough. Each player does the following:
- Choose a Hero and take that Hero’s figure(s), Hero mat, reminder card(s), and initiative token(s) and place them in front of you.
- Place your 4 Hero Cards near your Hero mat.
- Choose 1 of each class of Item (1 Major Item and 1 Support Item) and place them near your Hero mat.
- Resolve any Setup Flags on your equipped Hero and Item Cards.
- Claim 1 spot on your Hero’s Power Tree.
- Deploy your Hero figure(s) on the map.
Schemer Notes
Chitin Brawler:
- When “How about a refreshing acid bath” refers to the Nearest ~ Unoccupied Acid Pool or Trap, it means the one nearest to the Chitin Brawler itself, not the one nearest to the target.
Map Features

- Acid Pool – Hazard:
- These spaces are Dangerous and deal damage to figures occupying them during the Objective Phase.
- Deal damage to each figure on an Acid Pool space during the Objective Phase.
- These spaces do not cause damage to figures that move through them.
- Difficult:
- These spaces cost an additional point of Move to enter.
- This does not affect a figure using Leap or a figure being Pulled, Pushed, Grabbed, or Placed.
- Door:
- These spaces block Line of Fire and Burst Templates as long as the door token remains in play.
- A door will be removed automatically when a Hero enters its space, triggering “Event: Surprise Enemies!”
- Impassable:
- These spaces block movement and Attacks.
- No figure may enter these spaces, nor may tokens be placed on these spaces.
- Line of Fire may not be drawn through these spaces.
- Trap:
- Traps are Dangerous and will deal damage to figures who Move onto or through them.
- This includes figures who are Pulled or Pushed onto or through them, and figures that are Grabbed or Placed onto them.
- Figures may Leap over Traps without penalty.
- Wall:
- Walls separate adjacent spaces from one another and are represented by purple lines.
- Figures, Lines of Fire, and Burst Templates cannot go through a wall.
Market Health
To save the Grey Market:
- Defeat certain Schemers.
- Reveal each of the four buildings.
Grey Market Damage:
- The Grey Market will start with some damage based on Hero count and difficulty level.
- The Grey Market will take damage during the Objective Phase each round.
- Damage amount equals the number of buildings not yet revealed.
- Siege Jellies may also cause damage to the Grey Market depending on their Scheme.
Lose Condition:
- If the Grey Market takes damage greater than or equal to its Fortitude, the players lose!
Opening Doors
Door Mechanics:
- Doors are removed automatically when a Hero (or Companion in Solo Mode) enters a space with a door.
- After a door is opened, remove all other doors from that building.
- There are four buildings, and each building’s door spaces are marked with the same color door icon.
- If a Hero or Companion is forced into a door space by a Scheme or ability, remove the door and reveal the building.
- Schemers cannot be forced onto a door by Schemes or abilities.
- Pooky, Illusions, and other Allies or tokens the players control may not enter spaces containing doors.
Revealing Buildings:
- When a building is revealed, trigger the “Event: Surprise Enemies!”
Stop Point
- Lose Condition:
- Players lose if any Hero is Defeated.
- Players lose if the Grey Market is Defeated.
- Win Condition:
- Players win if, during the Objective Phase, all buildings have been revealed and all Siege Jellies have been Defeated.
- Gameplay Instructions:
- Read the Event description in the Walkthrough, then begin the game.
- If a player reveals a building during the Combat Phase, resolve the “Event: Surprise Enemies!”
- To win, resolve the “Event: Surprise Enemies!” four times (once for each building), then Defeat all Siege Jellies.
Event: Surprise Enemies!
When a building is revealed, do the following in order:
- Pause the Combat Phase and the Scheme or ability that revealed the building.
- Remove all other doors from that building. These doors will be on spaces that share the same color icons as the removed door.
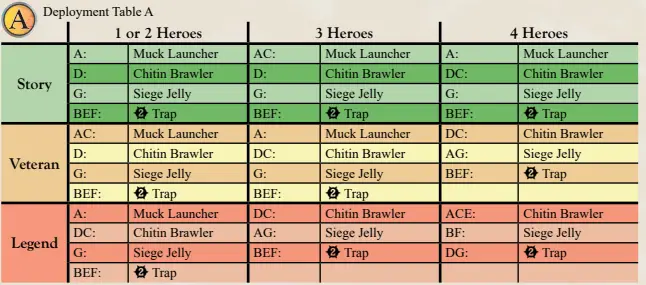
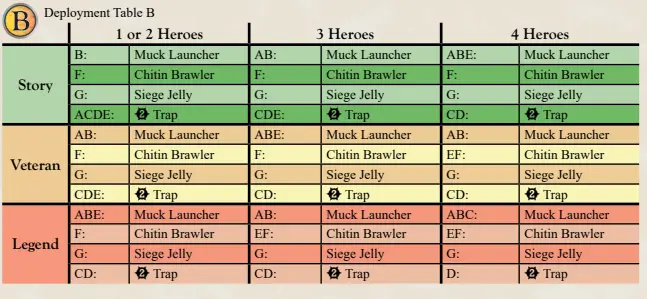
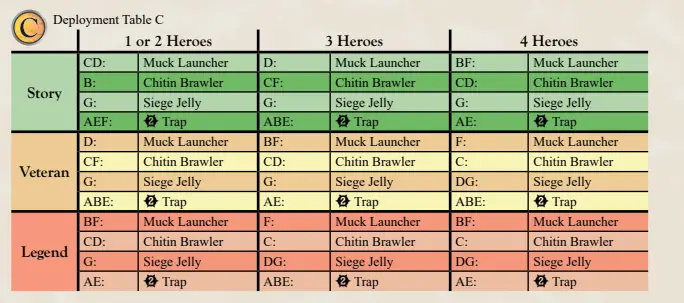
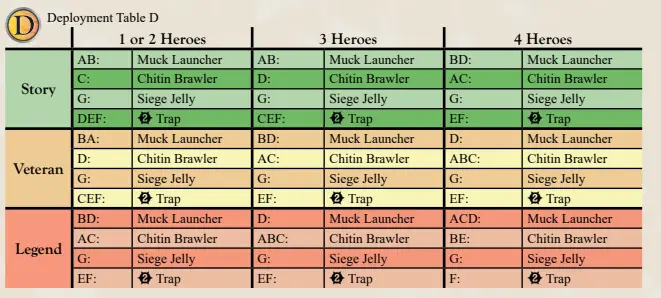
- Reveal that building’s randomizer token and Reinforce that building with the matching deployment table listed below. Note: Some buildings do not have all of the lettered spaces found on the deployment table. Do not deploy on missing letters.
- Continue the Combat Phase from where you left off
Deployment Table A
Deployment Table B
Deployment Table C
Deployment Table D
Epilogue
You survey the wreckage of the market stalls, slime puddles, and splintered crab men carapaces. Despite extensive damage, the Grey Market is saved, and Undercitizens are spared. However, there are fewer oceanic creature corpses than expected, raising concern. Fiona notes the absence of the large, chatty crab leader during the fight, and Zot worries the leader, likely their commander, escaped. Deirdre recalls the leader’s plan to advance toward the Great Temple and insists on warning others. Gerki identifies a cavern entrance and claims to know a shortcut, urging the party to follow.
Rewards
Unlock items in Vault 26 – 27.
Scenario 4 The Sinking Feeling
Prologue
You chase the giant crab man through the Undercity’s tunnels towards the Great Temple. Gerki leads you through brackish pools and phosphorescent slime trails, with the air growing thick and sour. As you enter a massive, brightly lit chamber supported by four dwarven-crafted pillars, Deirdre marvels at the engraved scriptures of Greyport’s gods. The crab man, surrounded by slime, threatens you with more oceanic invasions. Deirdre’s awe and Eve’s sarcasm interrupt his rant, frustrating him.
The crab man blows a conch shell, causing the chamber walls to shake and release torrents of slime and oozes, which begin dissolving the pillars. Fiona shouts to hurry, and Deirdre emphasizes the need to protect the supports. Zot directs everyone to the clear spots on the floor to stop the slime. Pooky leaps into action, nearing the creatures on the nearest pillar. As you prepare to fight, the crab man laughs mockingly.
Stop Point
Read “Setting up Scenario 4” in the Walkthrough
Setup
- Place the scenario map and Epic Pool in the middle of the play area.
- Place a two-space-long Gravel Wall on each of the double-wide door spaces, creating five destructible “doors” on the map.
- Using the following table, place the indicated amount of damage onto the Temple Foundation’s damage box.

Prepare the Schemers

Finally, deploy the following Schemers to the map

Keywords
- Big Bad:
- If this figure would gain Debuff Tokens, it gains one fewer token of that type.
- Immobile:
- This figure never moves. If an effect would cause it to be moved, it remains where it is.
- Immune to Traps:
- This figure does not trigger Trap tokens and treats them as Safe spaces.
- Zot’s Wizard Fire tokens are not Traps and can still damage this figure.
- Resistant:
- As long as this figure has a Shield Token or a Toughness Token, it does not trigger Traps and treats them as Safe spaces.
- If this figure is on a Trap when it loses its last Shield/Toughness Token, it immediately triggers that Trap.
Deploy
Deploy the following to Entrance Chambe

Heroes
- Choose a Hero and take that Hero’s figure(s), Hero mat, reminder card(s), and initiative token(s). Place them in front of you.
- Place your 4 Hero Cards near your Hero mat.
- Choose 1 of each class of Item (1 Major Item and 1 Support Item) and place them near your Hero mat.
- Resolve any Setup Flags on your equipped Hero and Item Cards.
- Claim 2 spots on your Hero’s Power Tree.
- Deploy your Hero figure(s) on the map.
Map Features

Difficult:
- These spaces cost an additional point of Move to enter.
- This does not affect a figure using Leap or a figure being Pulled, Pushed, Grabbed, or Placed.
Gravel Wall – Special:
- These tokens are Impassable and Destructible.
- Gravel Wall spaces block movement and Attacks.
- No figure may enter these spaces, and tokens may not be placed on these spaces.
- Gravel Wall spaces may be attacked by Heroic figures.
- When a Heroic figure uses an Attack, they may treat either space a Gravel Wall occupies as though it were a Foe while resolving the Attack.
- If a Gravel Wall is dealt damage, remove it from the map.
- When a Gravel Wall is removed from the map, revealing a new room for the first time, immediately Reinforce that room.
- Damaging a Gravel Wall will trigger Harm effects on the Attack that damaged it.
Impassable:
- These spaces block movement and Attacks.
- No figure may enter these spaces, nor may tokens be placed on these spaces.
- Line of Fire may not be drawn through these spaces.
Trap:
- Traps are Dangerous and will deal damage to figures who Move onto or through them.
- This includes figures who are Pulled, Pushed, Grabbed, or Placed onto them.
- In this scenario, a Hardened Slime that is deployed onto a Trap will trigger that Trap.
Schemer Notes
Chitin Guard:
- Chitin Guards do not use a Scheme Die.
- They use the same Scheme every round.
- The Chitin Guard’s Move ability is not part of the Harm effect above it.
- The Move ability happens regardless of whether or not the Attack damaged a Foe.
Oozing Fauna
Objective to Save the Great Temple:
- Defeat all the Oozing Fauna.
- Defeat the Crab King.
Temple Foundation Damage:
- The Temple Foundation will take damage from the Oozing Fauna.
- The Foundation may start with some damage based on Hero count and difficulty.
- Whenever an Oozing Fauna acts, it will damage the Temple Foundation unless it is Weakened (i.e., it has one or more Weaken Tokens).
- If the Temple Foundation takes damage greater than or equal to its Fortitude, the players lose.
Oozing Fauna Activity:
- Each Oozing Fauna acts every round, even if it is in a section of the map that has not yet been revealed.
Stop Point
Lose Condition:
- The players lose if any Hero is Defeated.
- The players lose if the Temple Foundation is Defeated.
Objective:
- Reveal all rooms.
- Defeat all Oozing Fauna.
Gameplay Instructions:
- Begin playing.
- Reinforce rooms using the provided tables as you reveal them during the Combat Phase.
- When all rooms have been revealed, continue to the next Stop Point.
Reinforce
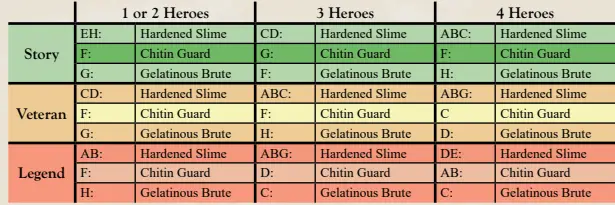
Upper Passage: The acrid smell of acid and slime hits your nose hard when this passage is opened. And the floor is moving. That’s
probably not good either. Deploy the following to the Upper Passage:

Lower Passage: As the gravel crumbles, you immediately duck under a volley of muck fired from the crab men guarding this passage’s
acid spewing plant… animal… things? Deploy the following to the Lower Passage:

Back Passage: This chamber is massive, with the worst infestation of slime-spitting spawn coating the walls. Deploy the following to the Back Passage:
Stop Point
Lose Condition:
- The players lose if any Hero is Defeated.
- The players lose if the Temple Foundation is Defeated.
Objective:
- Defeat all Oozing Fauna.
Gameplay Instructions:
- Continue the game.
- If it’s the Objective Phase and all Oozing Fauna have been Defeated, resolve the Event “Approach of the Crab King”.
Event: Approach of the Crab King
- Remove any remaining Gravel Walls from the map.
- Read “Confronting the Crab King” in the Walkthrough
The Crab King
Setup:
- Put the Crab King standee into the purple base.
- The Crab King deploys with a variable number of Toughness Tokens (listed below).
- When the Crab King becomes Wounded, he gains that many Toughness Tokens again.
- At certain difficulty levels, the Crab King uses two initiative tokens instead of one.
- If the Crab King is using multiple initiative tokens, then after his first turn, reroll his Scheme Die.

Reinforce
Deploy the following to the Entrance Chamber

Stop Point
Lose Condition:
- The players lose if any Hero is Defeated.
- The players lose if the Temple Foundation is Defeated.
Win Condition:
- The players win if it’s the Objective Phase and the Crab King and all Oozing Fauna have been Defeated.
Gameplay Instructions:
- Continue playing.
- When the Crab King becomes Wounded, pause the current turn and resolve the event “Slime Whisperer”.
Event: Slime Whisperer
- Flip the Crab King’s Boss Mat to its Wounded side, remove all damage tokens from it, and reroll its Scheme Die.
- The Crab King regains Toughness Tokens as listed in the table above.
- Deploy a Gelatinous Brute in the Nearest ~ Unoccupied Safe space to the Crab King.
- Continue playing until either the Lose or Win Condition has been met.
Epilogue
With a surprising cry of fury, Deirdre shatters the dead crab man’s conch against the floor, causing the slime to slow to a trickle and the remaining oozes to retreat. The pillars supporting the Great Temple remain intact but will need repairs. Relieved and grateful, the party congratulates each other and laughs at the holes in their clothing. A contingent of priests and paladins enter, shouting prayers of thanks. Deirdre explains that sea creatures sought to destroy the temple, but they were stopped. The high priest of Korash praises their timely intervention, noting the temple would have been lost without them. Gerki makes a pun about “stemming the tide,” which the high priest finds unintentional but thanks them for their bravery. The priests invite the party to the Great Temple, promising curative magics and a potential reward from Grand Cleric Ohava. Gerki eagerly agrees to accompany them.
Rewards
- Unlock Vault 28 – 47, Archive Vault Card 13 – Wizard Fire, Vault Cards 14-17 – Potion of Scrapes, and Eve Start Card 3 – Eve’s Illusion.
- New Hero cards go to their heroes
- New item cards are added to the Armory
Stop Point
Read “Finishing Chapter 1” in the Walkthrough.
When you’re ready to continue, open the Chapter 2.