Tales from the Red Dragon Inn – Chapter 4 Scenario Book Summary
Summary of the Chapter 4 Scenario book provides a condensed reading version to help you get straight to playing quickly.
Chapter 4 covers scenarios 17 – 21.
Spoiler Alert! Jumping to this book ahead of other chapters will result in SPOILERS!
Other Tales from the Red Dragon Inn Resources:
Chapter 1 Walkthrough Summary
Reference Manual
Chapter 1 Scenario Book Summary
Chapter 2 Scenario Book Summary
Chapter 3 Scenario Book Summary
Chapter 4 Scenario Book Summary
Chapter 5 Scenario Book Summary
Our overview page of Tales from the Red Dragon Inn explains what the game is about and shares reviews and videos on the web.
Scenario 17 – The Barrier
Prologue
The party continues their journey, weary and determined to find Vice Chancellor Longmont. Their spirits are lifted by the joy of new adventures with their companions. They encounter ancient ruins, examining hieroglyphs that might hold recipes. Beyond the plaza, they spot a massive pyramid, prompting Thaamrt to suggest exploring it.
As they approach, the invisible shield protecting the pyramid causes their items to fly up and out of reach. They decide to analyze the magical barrier and cast spells to gather information. Eventually, they conclude there is a way to collapse the barrier.
They plan to match their frequency with the barrier using their magical power, aiming to bring it down. As they begin, the barrier shows signs of weakening, but creatures from the ruins attack, forcing the party to defend themselves while continuing their efforts.
Setup
- Unlike in Scenario 16, Dire Scorpions only take up one space each in this and most future scenarios.
- Place the scenario map and Epic Pool in the middle of the play area.
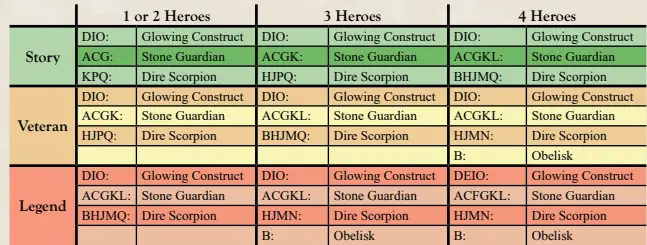
- Prepare the following schemers.

Deploy
Deploy an Obelisk on each of the three blue-border Obelisk spaces, then deploy the following.
Map Features
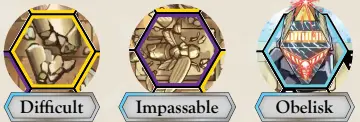
- Difficult: Yellow-border spaces; cost an additional Move point to enter.
- Impassable: Purple-border spaces; no figures or tokens can enter, and Line of Fire cannot be drawn through them.
- Obelisk – Impassable: Obelisks on blue-bordered spaces; no figures or tokens can enter, and Line of Fire cannot be drawn through them. When an Obelisk is defeated and removed, the space can be used normally.
Heroes
- Choose a Hero and take Hero’s figure(s), Hero mat, reminder card(s), and initiative token(s). Place them in front of you.
- Choose 4 of your 8 Hero Cards and place them near your Hero mat.
- Choose 1 of each class of Item (1 Major Item, 1 Support Item, and 1 Masterwork Item) and place them near your Hero mat.
- Resolve any Setup Flags on equipped Hero and Item Cards.
- Claim 8 spots on your Hero’s Power Tree.
- Deploy your Hero figure(s) on the map.
Keywords
Heroic: The Ritual Caster is a Friend to the Heroes and a Foe to the other Schemers. They still count as a Schemer, though.
Immobile: A figure with Immobile never moves. If an effect would cause it to be moved, it instead remains where it is.
The Ritual Caster
- Either Eve or Zot will try to take down the barrier in this scenario.
- They count as a Schemer but with player-made choices.
- The Ritual Caster always acts first in each round; keep their initiative token nearby.
- Can deal damage to a non-Obelisk Foe (not an Attack, cannot use Epic Die).
- If Zot is the Ritual Caster, Pooky is not used in the scenario.
- The Ritual Caster has 20 Fortitude; track damage on their Scheme Block.
- Players lose if the Ritual Caster is Defeated.
- Ritual Caster starts with some damage depending on difficulty.

Obelisks
- Obelisks are Impassable by all figures.
- Can be Disabled by the Ritual Caster; place the Ritual Caster’s gold-border initiative token on its tracker card.
- Initiative token stays until the Obelisk is Defeated or the Ritual Caster Disables a different Obelisk.
- Disabling a new Obelisk re-enables the previous one.
- Disabled Obelisks take different actions and lose their Doom icon.
- At Story and Veteran difficulties, do not roll the Doom Die against a Disabled Obelisk.
- At Legend difficulty, roll the Doom Die but only take 1 unavoidable damage to remove Doom from your roll.
- Damage dealt by Obelisks to the Ritual Caster does not count as an Attack and cannot be avoided by removing a die from the Epic Pool.
- Not affected by Weaken Tokens and does not trigger Reactions like Deirdre’s The Goddess doesn’t like that.
Schemer Notes
- Glowing Construct: Range Attack on Laser Blast targets the Nearest Foe to the Glowing Construct within Range 4 of an Obelisk.
- Damaging the Ritual Caster with Focused Beam does not count as an Attack.
- Cannot be avoided by removing a die from the Epic Pool.
- Not affected by Weaken Tokens.
- Does not trigger Reactions that trigger on a figure being Attacked.
Stop Point
Conditions
- Lose Condition: Players lose if any Hero or the Ritual Caster is Defeated.
- Win Condition: Defeat all Obelisks and all Glowing Constructs.
Gameplay Note
- Begin the game. When an Obelisk is Defeated, pause the current turn and resolve the Event “Shattered Obelisk.” This Event is resolved once for each Defeated Obelisk.
Event: Shattered Obelisk
Before removing the Obelisk figure from the map, deploy the following in the Nearest Unoccupied space(s) to the Obelisk:

Epilogue
As the last of the obelisks falls, the barrier dissipates, leaving the pyramid open and undefended. The novice adventurers emerge from hiding, cheering. Pherry enthusiastically praises Fiona, reenacting their swordplay. Thaamrt compliments Zot and Eve on their impressive display of magic, suggesting he could write a monograph about it. Runa thanks the group for their help, noting they couldn’t have succeeded without them.
Artin smiles and nods curtly, simply saying, “Nice.” Gerki dramatically pauses before suggesting they loot the monuments and tombs. The adventurers, including Gerki, Gog, and Fiona, excitedly raise their hands in agreement.
Rewards
Unlock items in Vault 119 – 123
Archive Vault Card 28 – Claw Hammer, Vault Card 51 – Amulet of Lightnin
Scenario 18 – A Tomb With All the Trappings
Prologue
The party, accompanied by their new adventuring companions, approaches a sun-seared pyramid. They inspect promising stones, with Gerki noticing hidden ones and proposing to climb up. Despite fatigue, they reach the pyramid’s top layer, discovering a square decorated with carvings. They proceed, lifting a disc that reveals a deep hole. Deciding against teleporting down, they use ropes to descend into the pyramid, encountering a chamber with hieroglyphs and statues.
Inside the chamber, they activate a pressure plate, causing statues to come to life. Artin, a novice adventurer, inadvertently triggers the trap. The group faces a volley of javelins and attacks from blue-black scorpion beetles. They barely notice the statues stepping down, leading to a chaotic battle. The party readies themselves to face the threats while protecting the less experienced Artin.
Setup
- Place the scenario map and Epic Pool in the middle of the play area.
- Put the Switch Tokens near the map.
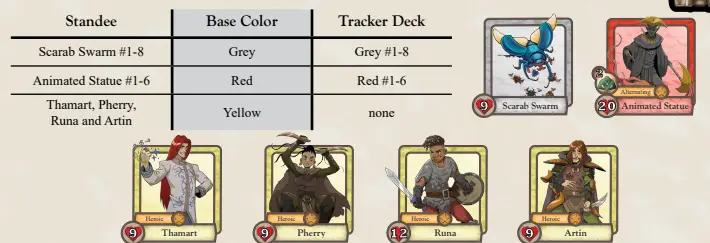
- Prepare following Schemers:
Deploy
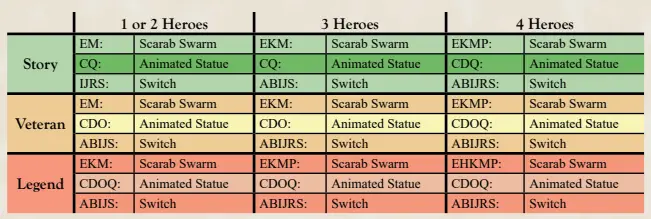
Deploy Thamart on space N, Pherry on space F, Runa on space L and Artin on space G, then deploy the following:
Map Features
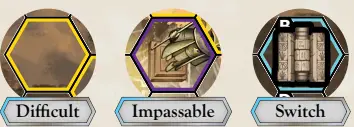
- Difficult: Yellow-border spaces; cost an additional Move point to enter.
- Impassable: Purple-border spaces; no figures or tokens can enter, and Line of Fire cannot be drawn through them.
- Switch: Some blue-border spaces have Switch Tokens. Heroic figures must occupy these spaces to Disable Hidden Traps.
Heroes
- Choose a Hero and take Hero’s figure(s), Hero mat, reminder card(s), and initiative token(s). Place them in front of you.
- Choose 4 of your 8 Hero Cards and place them near your Hero mat.
- Choose 1 of each class of Item (1 Major Item, 1 Support Item, and 1 Masterwork Item) and place them near your Hero mat.
- Resolve any Setup Flags on equipped Hero and Item Cards.
- Claim 9 spots on your Hero’s Power Tree.
- Deploy your Hero figure(s) on the map.
Hidden Traps
- Setup:
- Shuffle blue tracker cards to make the Trap Deck:
- 1 or 2 Heroes:
- Story: Blue 4
- Veteran: Blue 1, 2, 4
- Legend: Blue 1, 2, 3, 4, 5
- 3 Heroes:
- Story: Blue 2, 4
- Veteran: Blue 1, 2, 5
- Legend: Blue 1, 2, 3, 4, 5
- 4 Heroes:
- Story: Blue 2, 3, 4
- Veteran: Blue 1, 2, 3, 5
- Legend: Blue 1, 2, 3, 4, 5
- 1 or 2 Heroes:
- Shuffle blue tracker cards to make the Trap Deck:

- Trap Activation:
- First few Heroic figures each round take a random trap effect.
- When a Heroic figure’s initiative token is drawn, reveal the top card of the Trap Deck.
- Apply the trap effect based on the blue “Hidden Traps” block on the map.
- Heroes after the Trap Deck is exhausted will not take trap effects.
- Trap Effects:
- Apply only to the Hero’s own figure, not controlled figures.
- Prevent with Shield Tokens or Toughness Tokens.
- Cannot Empower Defense with Epic Die or Leap away with Evade Token.
- Disabling Traps:
- Each Switch space on the map must be occupied by a Hero, novice adventurer, or Solo Mode Companion during the Objective Phase.
- Remove the Trap Deck from the game after disabling traps.
- No more Hidden Trap effects will occur.
Novice Adventurers
- Adventurers: Thamart, Pherry, Runa, and Artin are Heroic Schemers with their own initiative tokens.
- Actions: Activate their Scheme each time their initiative token is drawn. Track damage on their Scheme Blocks.
- Role: They are still Schemers; they target the Nearest Foe with their Ranged Attacks.
- Control: Heroes may direct novice adventurers with the following ability:
- Action: Shout Orders! Move 3 a novice adventurer that isn’t Stunned, then Stun that figure.
- Special Rule:
- If a novice adventurer occupies a Switch and Hidden Traps are not Disabled, they stay on the Switch unless directed by a Hero with Shout Orders!
- They follow the rest of their Schemes normally.
- Hidden Trap #3 places a novice adventurer adjacent to their Nearest Foe, even if it moves them off a Switch.
Keywords
- Alternating: This Schemer Group alternates Schemes instead of rolling a Scheme Die. In Round 1, place a Scheme Die on the top Scheme. In subsequent Roll Scheme Dice steps, move the Scheme Die to the other Scheme.
- Heroic: Novice adventurers are Friends to Heroes and Foes to other Schemers. They still count as Schemers.
Schemer Notes
- Scarab Swarm: During the Objective Phase of each round, each Heroic figure adjacent to one or more Scarab Swarms takes 1 damage.
- Damage can be prevented with Shield Tokens or Toughness Tokens.
- Does not count as an Attack, so it is not affected by Weaken Tokens, Epic Dice, Hitback Tokens, Evade Tokens, etc.
Stop Point
Conditions
- Lose Condition: Players lose if any Hero or any novice adventurer is Defeated.
- Objective: Disable the Hidden Traps.
Gameplay Note
- Begin the game. Continue if it’s the Objective Phase and all Switches are Occupied by a Hero, a novice adventurer, or a Solo Mode Companion.
Reinforce

Epilogue
The statues and scarab beetles are defeated, and the party moves carefully, avoiding traps. Fiona and Gerki tend to wounds while the others regroup. Runa praises their efforts, and Pherry celebrates their success. Artin discovers a secret door under a pedestal, which Zot unlocks with magic. Inside, they find a treasure trove of gold, jewels, and relics. They decide to share the treasure, noting the lack of a heart symbol they were seeking.
Gerki encourages the young adventurers to explore more, warning them to stay safe. The party continues their journey, descending deeper into the pyramid, ready for the next challenge.
Rewards
Unlock items in Vault 124 – 125.
Scenario 19 – A Long Descent
Prologue
The party descends from the pyramid’s entrance into a maze of twisting passages. Gerki points out various traps, and the group decides to stay together, choosing the left path. They navigate pit traps, swinging blades, and other hazards while dealing with the disorienting layout. They proceed cautiously, Gerki leading and everyone following closely.
As they progress, they encounter more traps and signs of previous adventurers’ failures. They move through illusionary and low-magic sections of the maze, finding themselves in a trapezoidal-shaped chamber with steps leading deeper. Gerki ensures the path is safe, and they continue, entering a tight fit passageway.
Upon entering a room, they hear ominous sounds and prepare for an attack. The room is filled with glowing glyphs and ancient decorations. They are confronted by a booming voice calling them “Defilers” and warning of dangers. Scarab beetles and stone figures come to life, forcing the party to fight while navigating further into the labyrinth.
Setup
- Place the scenario map and Epic Pool in the middle of the play area.
- Put Switch Tokens on spaces 1, 2, and 3.
- Put a Portcullis Token on each of the three double door spaces.

Deploy

Map Features
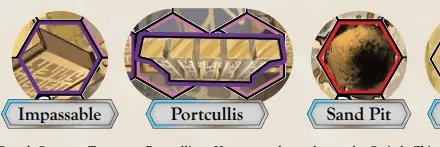
- Impassable: Purple-border spaces; no figures or tokens can enter, and Line of Fire cannot be drawn through them.
- Portcullis: Door tokens; impassable by all figures except Scarab Swarms. A Hero must throw the nearby Switch to open. This will allow new Schemers to deploy.
- Sand Pit – Hazard: Dangerous spaces; entering without Leaping causes 2 damage and Fatigue 2. Fatigue only affects Heroes. Schemes can place a Heroic figure into an Unoccupied Sand Pit, potentially moving them to a different Sand Pit.
- Switch: Three on the map, each controlling its nearby Portcullis. When a Hero occupies or is adjacent to a Switch, they can use the following action:
- Action: Throw the Switch! Remove this Switch Token and the nearby Portcullis from the map.
Heroes
- Choose a Hero and take Hero’s figure(s), Hero mat, reminder card(s), and initiative token(s). Place them in front of you.
- Choose 4 of your 8 Hero Cards and place them near your Hero mat.
- Choose 1 of each class of Item (1 Major Item, 1 Support Item, and 1 Masterwork Item) and place them near your Hero mat.
- Resolve any Setup Flags on equipped Hero and Item Cards.
- Claim 9 spots on your Hero’s Power Tree.
- Deploy your Hero figure(s) on the map.
Keywords
- Immune to Sand Pits: This figure is unaffected by Sand Pits and treats them as Safe spaces.
- Massive:
- Push/Pull effects targeting this figure are reduced to Push/Pull 1.
- Forced Movement effects reducing this figure’s Move are limited to 1.
- Not affected by Grab or Place effects.
Scarabs
- Movement: Scarab Swarms can move onto or through Portcullis spaces. Act when their initiative token is drawn, regardless of location.
- Objective Phase:
- Summon Scarabs, then each Heroic figure adjacent to one or more Scarab Swarms takes 1 damage.
- Summoning Order:
- Story: Switch #2
- Veteran: Switch #2, then Switch #3
- Legend: Switch #1, then #2, then #3
- Deployment: If all spaces adjacent to a Switch are occupied, deploy to the nearest unoccupied space.
- Switch Removal: If a Switch Token is removed, no more Scarab Swarms are deployed adjacent to it.
Stop Point
Conditions
- Lose Condition: Players lose if any Hero is Defeated.
- Objective: Open the first Portcullis.
Gameplay Note
- Begin the game. Read on immediately when the first Portcullis is opened.
Reinforce

Stop Point
Conditions
- Lose Condition: Players lose if any Hero is Defeated.
- Objective: Open the second Portcullis.
Gameplay Note
- Play on. Read on immediately when the second Portcullis is opened.
Reinforce

Stop Point
Conditions
- Lose Condition: Players lose if any Hero is Defeated.
- Objective: Open the third Portcullis.
Gameplay Note
- Play on. Read on immediately when the third Portcullis is opened.
Reinforce

Stop Point
Conditions
- Lose Condition: Players lose if any Hero is Defeated.
- Win Condition: Defeat all foes.
Epilogue
After a desperate battle, the party defeats the mages and their scorpion minions, while the remaining scarab beetles retreat. They proceed through a large door into the dark depths of the underground complex. Zot urges them to follow the scarabs. Fiona is puzzled, but Pooky jumps off Zot’s shoulder to follow.
Eve explains that someone might have summoned the enemies, and the survivors are likely reporting their failure. They decide to follow the professor. As they chase the scarabs, Gog asks Deirdre if she heard stone wizards talk. Deirdre confirms, mentioning they spoke about a “Protector.”
Gog reassures Deirdre, smashing his fists together and vowing to protect her and all friends from the Protector.
Rewards
Unlock items in Vault 126 – 130.
Archive Vault Cards 30-33 – Potion of Scrapes and Bruises, Vault Card 48 – Circlet of Focus
Scenario 20 – Heart of the Protector
Prologue
The party descends deeper into the desert, entering a subterranean room with murals depicting elves in battle. They find a tall obelisk-like structure, glowing with magical energy, and surrounded by skeletal remains of previous adventurers.
A regal figure of an elf woman emerges from the shadows, adorned in gold and jewels. She addresses the party, stating she is searching for the Heart of the Protector. Her headdress marks her as an ancient guardian, boasting of her long-standing role. She warns the party of the dangers ahead, and how many have fallen trying to take the Heart.
As she gestures towards the piles of corpses, insectoid minions come to life, becoming bone decorations for eternity. The elf woman, named Amduray, unleashes magical flames and summons scarabs and scorpions to attack the party, declaring that they will join the fallen if they proceed. The room is filled with skittering and scuttling as the insectoid and arachnoid minions advance.
Setup
- Place the scenario map and Epic Pool in the middle of the play area.
- Ensure the map is marked “20a – Heart of the Protector – Part 1.”
- Put Switch Tokens on spaces 1 and 2.
- Put a Portcullis Token on each of the two double door spaces.
- Prepare the following schemers:

Deploy
- Deploy the following.
- Amundyr is deployed at the start of the scenario.
- Amundyr will act every round, even if the Inner Sanctum has not yet been revealed.
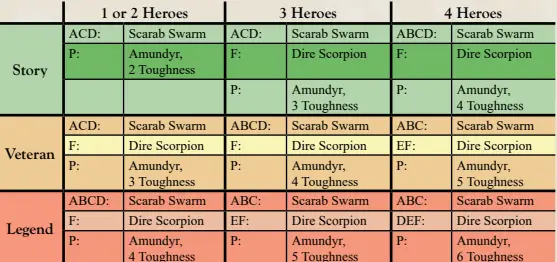
- Amundyr’s Toughness depends on the player count and difficulty.
Map Features
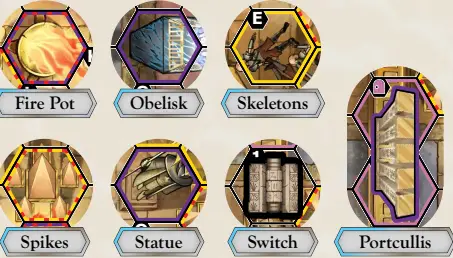
- Fire Pot – Impassable:
- No entry, tokens, or Line of Fire through these spaces.
- Figures adjacent to Fire Pots take 1 damage per Fire Pot.
- Damage not prevented by Shield or Toughness tokens.
- Obelisk – Impassable:
- No entry, tokens, or Line of Fire through these spaces.
- Skeletons – Difficult:
- Cost an additional point of Move to enter.
- Spikes – Difficult:
- Can be moved through with care, costing an additional point of Move.
- Figures moving onto or through Spikes via Forced Movement take 2 damage.
- Schemers do not treat these as Dangerous for movement.
- Statue – Impassable:
- No entry, tokens, or Line of Fire through these spaces.
- Switch – Impassable:
- No entry, tokens, or Line of Fire through these spaces.
- There are two Switches, each controlling its adjacent Portcullis.
- Action: Throw the Switch! Remove this Switch Token and the nearby Portcullis from the map.
- Portcullis:
- Impassable by all figures except Scarab Swarms.
- To open, a Hero must throw the nearby Switch, allowing new Schemers to deploy.
Heroes
- Choose a Hero and take Hero’s figure(s), Hero mat, reminder card(s), and initiative token(s). Place them in front of you.
- Choose 4 of your 8 Hero Cards and place them near your Hero mat.
- Choose 1 of each class of Item (1 Major Item, 1 Support Item, and 1 Masterwork Item) and place them near your Hero mat.
- Resolve any Setup Flags on equipped Hero and Item Cards.
- Claim 10 spots on your Hero’s Power Tree.
- Deploy your Hero figure(s) on the map.
Keywords
- Big Bad: If this figure would gain Debuff Tokens, it gains one fewer token of that type. This figure cannot be Stunned.
- Massive:
- Push/Pull effects are reduced to Push/Pull 1.
- Forced Movement effects reducing Move are limited to 1.
- Not affected by Grab or Place effects.
Amundyr
- Overview: Amundyr is a tough opponent in a two-part battle. Track her damage on her Scheme Block.
- Turn Order:
- Always acts first each round, even if the Inner Sanctum is not revealed.
- At Legend difficulty, uses an initiative token and takes two turns each round (reroll her Scheme Die after her first turn).
- End of Round Damage:
- Hero nearest to Amundyr takes 1 damage.
- Calculate distance as though Portcullises and Switches were not on the map.
- If multiple Heroes are tied, players choose who takes damage.
- Solo Mode Companion counts as a Hero for assigning this damage.
- Scarab Swarms deal end-of-round damage as in previous scenarios.
- Abilities:
- Wrap Whip: Moves Amundyr toward a Foe, stopping at the Portcullis.
- Includes a Melee Attack, affecting Foes after Portcullis is opened.
- Harm effect places the target on the nearest Unoccupied Spikes to Amundyr.
- Entomologist: Activates one of Amundyr’s Friends to use its current Scheme, still acting on its normal turn.
- Calculate distance to the nearest Friend as though Portcullises were open.
- If multiple Friends are tied, players choose which is targeted.
- Wrap Whip: Moves Amundyr toward a Foe, stopping at the Portcullis.
- Restrictions:
- Amundyr does not open Portcullises.
Stop Point
- Lose Condition: Players lose if any Hero is Defeated.
- Objective: Open the first Portcullis.
Gameplay Note
- Begin the game. Read on immediately when the first Portcullis is opened.
Reinforce
Deploy the following to the Approach:

Stop Point
- Lose Condition: The players lose if any Hero is Defeated.
- Objective: Defeat Amundyr.
Continue the game. Read on for Part 2 if it’s the Objective Phase and Amundyr has been Defeated.
Scenario 20 – Part 2
Despite the party’s efforts, Amduray remains a formidable foe, taunting them with her power and ancient magic. As the battle intensifies, the party notices another group of adventurers entering the chamber. They ignore this distraction and focus on Amduray and her minions.
Artin, in a desperate move, manages to topple the Heart of the Protector from its perch atop the obelisk. As Amduray shrieks in anger and surprise, Runa catches the Heart before it hits the floor. Thaamrt uses a force field to repel Amduray’s necrotic attacks. Enraged, Amduray commands her minions to attack while she grows in size and power, though her increased size causes her to crack and weaken.
The party rallies together, pushing forward to defend against Amduray’s onslaught. As they retreat with the Heart, they prepare to face Amduray and her three statues, which come to life, ready to fight alongside her. The scene is set for a final, intense confrontation.
Setup
- Defeat all Schemers.
- Remove all components from the map.
- Flip the map to the side marked “20b – Heart of the Protector – Part 2”.
- Reset the tracker decks.
- Prepare the following schemers:

Deploy
- Deploy the following; Schemer’s Toughness depends on player count and difficulty.
- Scarab Swarms and Dire Scorpions on the map at the end of Part 1 are Defeated and do not return in Part 2.
- Newly-deployed Scarab Swarms count as new Schemers with no damage.
- Amundyr begins Part 2 with no damage; damage from Part 1 does not carry over.
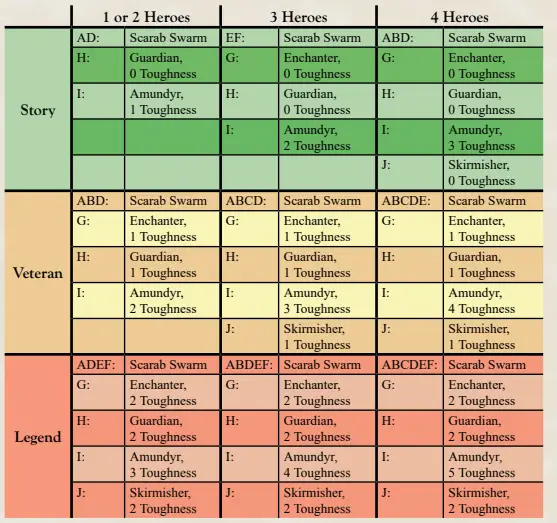
Amundyr’s Actions
- Amundyr acts first each round and uses an initiative token at all difficulty levels.
- Takes two turns per round.
- Follow special setup instructions for your player count and difficulty.

Heroes
- Preparation:
- Keep Hero and Item Cards in front of you.
- Charge and Cooldown Tokens stay on them.
- Invigorate at the start of each round as usual.
- Keep any Power Tokens or Debuff Tokens.
- Dice in the Epic Pool stay there.
- Wounded Status:
- Each Fresh Hero becomes Wounded.
- Remove all damage and flip to Wounded side.
- Resolve Reactions triggered by becoming Wounded in order of choice.
- Cannot prevent Wounding with abilities.
- Heroes Wounded in Part 1 stay Wounded and keep their damage.
- In Solo Mode, Companion keeps damage and current status (Fresh/Recovery/On Break).
- Defeat All Allies:
- Any tokens or figures added by Heroes during Part 1 are lost, including traps, Eve’s Illusions, and Zot’s Wizard Fire.
- Deployment:
- Deploy Hero figure(s) on the initial deployment spaces.
- Pooky starts on Zot’s space.
Other Notes
- Many spaces on the map are Difficult that were not in Part 1.
- Fire Pots and Spikes work the same as in Part 1.
- Scarab Swarms do not use a Scheme Die in Part 2; they use their Scheme each round until Defeated.
- If a Schemer finishes their turn and has initiative tokens left in the bag, reroll that figure’s Scheme Die.
- Skirmisher’s Blast Arrow: If multiple Foes are tied for Nearest to Amundyr, the tie is broken by whichever is Nearest to Skirmishers.
Stop Point
- Lose Condition: The players lose if any Hero is Defeated.
- Objective: Defeat all Foes.
Epilogue
After the fierce battle beneath the desert, the party debates the aftermath. Amduray lies defeated, but not without warning of dire consequences if the Heart of the Protector leaves its resting place. Gerki contemplates the situation, suggesting they leave quickly.
The party begins to ascend the staircase when Amduray, reverting to her mummy form, warns that removing the Heart will cause the world to end. She reveals that the Heart is tied to a dangerous power and is essential for safeguarding the world.
Despite the warnings, the party considers their options. Fiona suggests that since they know who has the Heart, they can return it if needed. Gerki and the others agree to return to the surface and reconvene with their companions. They prepare to face whatever comes next, deciding to keep the Heart close and deal with any consequences later.
Rewards
Unlock the Vault 131 – 132 from the Vault. New Item cards are added to the Armory. Note that the unnumbered scarab standee should be used as the Giant Scarab Ally.
Archive Vault Card 82 – Grappler’s Mask
Scenario 21 – Betrayal
Prologue
Following Amduray out of her inner sanctum, the party passes through a hidden door into an ancient elevator. Amduray commands the elevator to ascend, and thanks to Gog’s strength, they safely reach the top. Once outside, Amduray orders them to lead the way, resuming her regal composure.
As they walk briskly, they notice numerous scorpions and ruins around them. They expect to find their fellow adventurers at the camp but instead discover a gruesome scene with dead and injured companions. Runa is found severely injured, informing them that the Heart was stolen by attackers. Thaamrt and the horses are gone.
Gerki finds the nearest scorpion and prepares to follow Amduray’s instructions to retrieve the Heart. The party rides swiftly, noticing a dust cloud on the horizon indicating the direction of the attackers. As they pursue, they spot the fleeing attackers on horseback.
Amduray shows concern, urging them to hurry. They find Thaamrt fighting the attackers, with Pherry struggling nearby. The scene is tense as they approach to help recover the Heart and rescue their companions.
Setup
- Place the scenario map and Epic Pool in the middle of the play area.
- Note that Map 21 is on the back of Map 19.
- Put the Horse Tokens and the Rock Tokens nearby.
- Prepare the following schemers:

Air Elementals
- Number of figures and blue tracker cards used for Air Elementals varies by player count and difficulty.
- If instructed to deploy an Air Elemental but there are no cards in the tracker deck, do not deploy that figure.

The Encounter Deck
- This scenario refers to the Encounter Deck.
- Create the Encounter Deck by taking red damage tracker cards #1-6, shuffling them, and placing them near the map.
Mounted Figures
- This is a high-speed chase through the desert, with Pherry and Thamart riding horses and Heroes (or Solo Mode Companion) riding Amundyr’s scorpions.
- Mounted figures move slowly on the map but are running quickly to the east.
- Stationary items and figures move west each round to represent the heroes zipping past them.
Deployment and Movement:
- Place the mount (horse or scorpion) flat on the map with its head in the indicated space and its tail in the space immediately west. Place the Hero or Schemer onto the mount.
- A figure and its mount always move together.
- When moving, the mount’s head moves one space at a time, with its tail moving into the space the head just left.
- The mount’s head may not move directly into its tail’s space with a single movement.
- If pushed or pulled, the mounted figure stays in its current orientation.
- If grabbed or placed, the mounted figure goes to the orientation decided by grabbing or placing player.
Combat:
- Mounted figure counts as occupying both mount’s spaces.
- May use Attacks, draw Line of Fire, or count Range as though in either of those spaces.
- Burst Attacks may originate from either space.
- Burst Attacks against a mounted figure hit that figure only once, even if both spaces are inside the burst template.
Deploy
- Deploy the following.
- Pherry and Thamart have different Toughness based on player count and difficulty.
- Track Pherry and Thamart’s Toughness and damage directly on their Scheme Blocks.
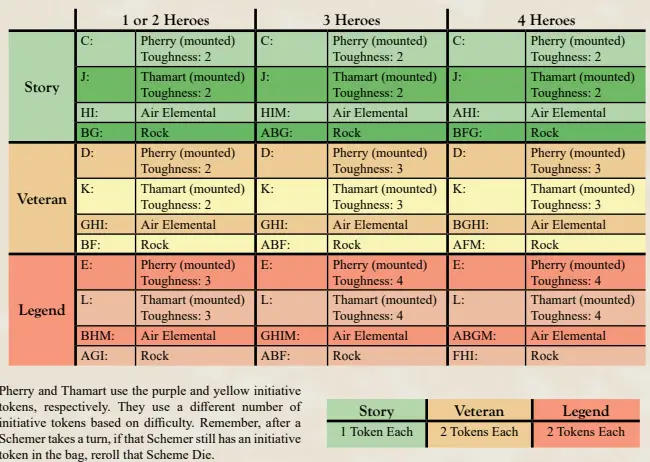
Heroes
- Choose a Hero and take Hero’s figure(s), Hero mat, reminder card(s), and initiative token(s). Place them in front of you.
- Choose 4 of your 8 Hero Cards and place them near your Hero mat.
- Choose 1 of each class of Item (1 Major Item, 1 Support Item, and 1 Masterwork Item) and place them near your Hero mat.
- Resolve any Setup Flags on equipped Hero and Item Cards.
- Claim 10 spots on your Hero’s Power Tree.
- Deploy your Hero figure(s), mounted on a scorpion on the map.
Keywords
- Immune to Rocks: This figure can enter spaces with Rock Tokens and treats them as Safe. Rock Tokens have no effect on this figure.
- Massive:
- Push/Pull effects are reduced to Push/Pull 1.
- Forced Movement effects reducing Move are limited to 1.
- Not affected by Grab or Place effects.
Pherry and Thamart
- Former companions now try to kill you and escape with the heart.
- Each has an effect that includes “Move 1 East.”
- This means “Move 1 to a numbered space, or off the edge of the map if this figure already occupies a numbered space.”
- If any part of their horse moves off the east edge of the map, players lose.
- Their Harm effects are multi-target Harm effects, so if damage is dealt to both targets, the Harm effect will cause the attacker to move twice.
- Thamart’s Earth Eruption: Places Rock Tokens onto the map.
- Places a Rock Token to the north of Thamart; if not possible, place in any Unoccupied adjacent space.
- If all spaces are occupied or contain Rock Tokens, do not place a Rock Token.
Hero Penalties
- Heroes are less effective at mounted combat.
- All Move, Leap, Push, Pull, and Range values on Heroic abilities are halved, rounded down (minimum of 1).
- Includes Hero Cards, Item Cards (including Allies), Pooky, and Power Tokens spent by Heroic figures.
- This penalty does not apply to Schemers.
- Pooky:
- Begins on Zot’s space but moves freely around the map.
- Moves with the mount and occupies both mount spaces.
- Counts as Stationary Object during the Objective Phase.
- If Pooky would leave the map, place him on Zot’s space.
- Allies:
- Begin adjacent to controlling Hero.
- Have same movement and range penalties as Heroes.
- Count as Stationary Objects during the Objective Phase.
Rocks
- Chase occurs in a rocky part of the desert; scorpions plow through them.
- Rock Tokens function like Traps, only damaging Heroic figures.
- If a Heroic figure enters a space with a Rock Token and is not mid-Leap, takes 3 damage and is shifted 1 space west.
- If cannot shift 1 space west, the blocking figure also takes 3 damage.
- Note: Evade Tokens only used in response to attacks, so may not spend them after taking damage from Rock Token.
- If Pooky is on the map, use his abilities without penalty.
Objective Phase
- Encounter Rocks:
- As new rocks come into view, place Rock Tokens on the map.
- Number of Rock Tokens placed each Objective Phase varies by difficulty.
- To Encounter Rocks, reveal the specified number of cards from the Encounter Deck and put Rock Tokens on corresponding numbered spaces.
- Shuffle all six cards together if all Rock Tokens are already on the map.
- Rock Tokens per Difficulty:
- Story: 2 Rock Tokens
- Veteran: 3 Rock Tokens
- Legend: 4 Rock Tokens
- Shift Stationary Objects:
- After Encounter Rocks, shift all Stationary Objects two spaces to the west.
- Stationary Objects include Allies, Illusions, Pooky (if not on mount), Traps, Wizard Fire, Rock Tokens.
- Mounted figures and Air Elementals do not count as Stationary Objects.
- Shift the westmost objects first and continue to the east.
- If a Heroic figure must shift to the west but can’t due to another figure, it stays where it is.
- If a Heroic figure would leave the map due to this shift, it is Defeated.
- If Pooky shifts onto or through a mount, he stays on that mount.
- If Pooky would leave the map, place him on Zot’s space.
- Return any tokens that leave the map to the supply.
- If a Trap hits any figure (other than Pooky), the Trap triggers and is removed from the map.
- If Wizard Fire hits a Schemer, it triggers and is removed.
- If a Rock Token hits a Heroic figure, it takes 3 damage and shifts 1 space west. Remove the Rock Token.
- Summon Air Elementals:
- Thamart summons Air Elementals to assist in battle.
- If Thamart is on the map, add Air Elemental figures to the east edge of the map.
- Number of elementals summoned depends on player count and difficulty.
- Reveal specified number of cards from the Encounter Deck to determine the spaces where new Air Elementals will deploy.
- Use the blue tracker deck to determine which figures to use.
- After deploying, reset the Encounter Deck.
- If the blue tracker deck has no more cards to deploy, do not summon new elementals until others are Defeated.
- Elementals per Player Count and Difficulty:
- 1 or 2 Heroes:
- Story: 1 per round
- Veteran: 1 per round
- Legend: 2 per round
- 3 Heroes:
- Story: 1 per round
- Veteran: 2 per round
- Legend: 2 per round
- 4 Heroes:
- Story: 2 per round
- Veteran: 2 per round
- Legend: 2 per round
- 1 or 2 Heroes:
Stop Point
- Lose Condition: Players lose if any Hero is Defeated.
- Lose Condition: The players lose if either Pherry or Thamart escape off the map to the east.z
- Win Condition: Defeat all Foes.
Epilogue
The party runs down the adventurers and dismounts from their horses. They find the group bloodied and defeated, with Thaamrt knocked off his horse and Pherry injured. Thaamrt reveals he has the Heart of the Protector. He commends the party for their toughness.
Pherry, badly injured, confirms they were pretending to be novices to join the group and steal the Heart. She laments having to cut her throat to survive. Thaamrt shows a ring of teleportation, proving he was prepared for anything.
The party decides to return to camp, escorted by Amduray and Runa. Amduray scolds them for being tricked and insists they must now find the Heart and punish those who stole it. She assigns Runa to go with them, despite her injuries.
Back at camp, Amduray tells the party they were duped by Longmont, who facilitated the whole plan for his purposes. The party agrees to retrieve the Heart and correct their mistakes, setting off once again into the desert to complete their mission.
Rewards
Unlock Value 133 – 153 from the Vault. New Hero cards go to their Heroes and new Item cards are added to the Armory.
Archive the following:
Deirdre: Vault Card 1 – Mass Heal, Vault Card 35 – Crescent Moon Flare
Eve: Vault Card 4 – Flim-Flamstrike, Vault Card 38 – All together now
Fiona: Vault Card 5 – Why hold ground, Vault Card 39 – I instinctively aim for the head
Gerki: Vault Card 8 – Look! Over there! A distraction!, Vault Card 42 – Have a nice trip
Gog: Vault Card 43 – Gog the Strongest, Vault Card 44 – Gog help
Zot: Start Card 1 – Of course lightning arcs around corners, Vault Card 47 – Pooky and I have an understanding
Other Tales from the Red Dragon Inn Resources:
Chapter 1 Walkthrough Summary
Reference Manual
Chapter 1 Scenario Book Summary
Chapter 2 Scenario Book Summary
Chapter 3 Scenario Book Summary