Tales from the Red Dragon Inn – Chapter 2 Scenario Book Summary
Summary of the Chapter 2 Scenario book provides a condensed reading version to help you get straight to playing quickly.
Chapter 2 covers scenarios 5-10.
There are new Power and Debuff Tokens:

Spoiler Alert! Jumping to this book ahead of other chapters will result in SPOILERS!
Other Tales from the Red Dragon Inn Resources:
Chapter 1 Walkthrough Summary
Reference Manual
Chapter 1 Scenario Book Summary
Chapter 2 Scenario Book Summary
Chapter 3 Scenario Book Summary
Chapter 4 Scenario Book Summary
Chapter 5 Scenario Book Summary
Our overview page of Tales from the Red Dragon Inn explains what the game is about and shares reviews and videos on the web.
Scenario 5
Prologue
Following your epic battle against the nefarious crab man and his legions of slime, artisans and stonemasons from Greyport have been repairing the Great Temple’s support pillars in the Undercity. Under the direction of Gerki and Fiona, you have been working with the Greyport City Guard and the Undercity’s Runoff Rangers to thoroughly clean the Undercity. Your mission has been to eradicate any remaining bits of slime and spores that could pose future threats. After extensive cleaning with scrub brushes, soap, and magic, you are confident that no future menace remains.
One day, you find yourself exploring a distant tunnel, away from your Runoff Ranger chaperones. Eve discovers a mysterious carving on a column, which Zot identifies as a symbol of a forbidden mystic order known for enslaving elementals and conducting dark experiments. Despite Zot and Eve initially dismissing the symbol as potential graffiti by a student, Deirdre notes that it looks freshly carved, prompting further investigation.
Using a detection spell, Eve and Zot identify nearby elemental magic, and the group follows Zot’s lead. As you proceed, Eve struggles with the abundance of magical items, affecting her vision. The group eventually enters a chamber where altered corpses are arranged in a circle. Energized by magic, these corpses reanimate and attack the group, their prostheses and grotesque muscular enhancements making them formidable foes.
Setup
- Place the scenario map and Epic Pool in the middle of the play area.
- Place the round tracker token on the “1” space in the “Playing the Round” box.
- Randomly place the “A” and “B” Randomizer Tokens face down on spaces 3 and 5.
- Prepare the following schemers.

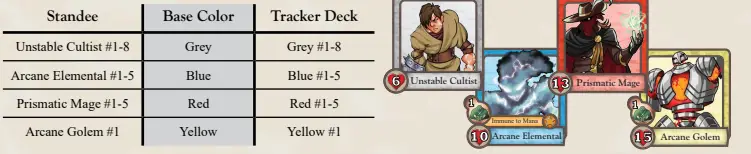
Keyword
Immune to Mana: This figure is unaffected by Mana Pools and treats them as though they were Safe spaces
Deploy
Deploy the following to the Entryway:
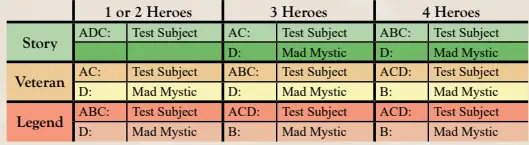
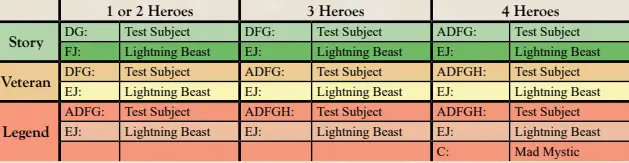
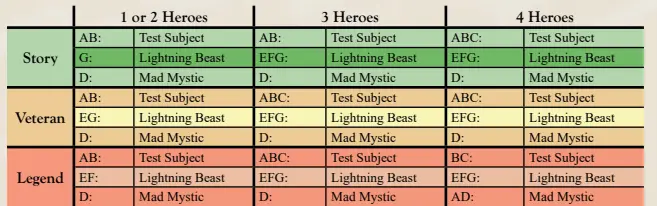
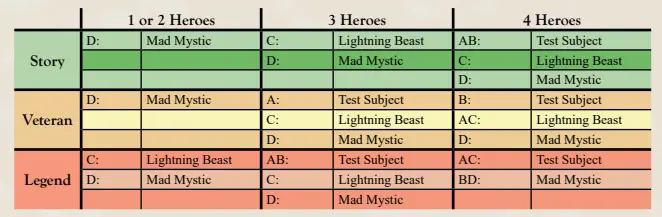
Schemes in this scenario:
- Range:
- Can target any Foe on the map.
- Ranged Attacks always target the Nearest Foe(s).
- Lightning Beasts:
- Sometimes move toward the Farthest Foe.
- Target the Foe farthest away on the map by Line of Fire.
- Move along the shortest, most direct path to get adjacent to that Foe.
- Mad Mystics:
- Each deploy with a Shield Token.
- Shield Tokens function the same as Toughness Tokens for Schemers like Lightning Beasts.
Heroes
Each player:
- Chooses a Hero and takes the Hero’s figure(s), mat, reminder card(s), and initiative token(s) and places them in front.
- Chooses 4 out of 6 Hero Cards and places them near the Hero mat (the other 2 will not be used).
- Chooses 1 Major Item and 1 Support Item and places them near the Hero mat.
- Resolves any Setup Flags on equipped Hero and Item Cards.
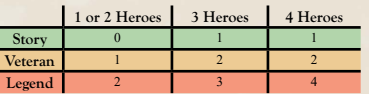
- Claims 2 spots on the Hero’s Power Tree.
- Deploys Hero figure(s) on the map.
Map Features
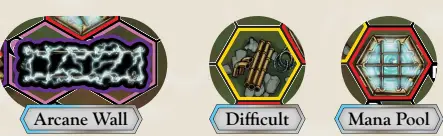
Arcane Wall – Impassable:
- These tokens are impassable.
- The scenario will indicate when they should be removed.
Difficult Spaces:
- Cost an additional point of Move to enter.
Mana Pool – Hazard:
- These spaces are dangerous and deal damage to figures that enter or occupy them.
- A figure entering a Mana Pool space takes 2 damage.
- During the Objective Phase, any figure on a Mana Pool takes an additional 2 damage.
Stop Point
Lose Condition:
- Players lose if any Hero is defeated.
Objective:
- Defeat all Foes in the Entryway.
Start of the Game:
- Begin the game. If it’s the Objective Phase and all Foes are defeated, read on.
Reinforce
Remove the Arcane Wall separating the Entryway from the Orb Room, then deploy the following to the Orb Room:
New Map Features

This space is impassable and used in the objectives below
- Boilers – Hazard, Impassable:
- These containers sizzle at the slightest touch.
- If a figure ends a Forced Movement effect adjacent to one of these spaces (even if it leaves the figure on the same space as it started), that figure takes 1 damage.
- Orb of Power – Impassable:
- This space is impassable and used in the objectives below.
Stop Point
Lose Condition:
- Players lose if any Hero is defeated.
Objective:
- Defeat all Foes OR each Hero is adjacent to the Orb of Power.
Continue Playing:
- In the Objective Phase, if all Foes have been defeated AND a Hero is not adjacent to the Orb of Power, resolve the Event “Investigate the Orb,” then read on.
- If it’s the Objective Phase and all Heroes are adjacent to the Orb, skip “Investigate the Orb” and read on.
Event: Investigate the Orb:
- Place each Hero in an unoccupied space adjacent to the Orb of Power.
Event: The Orb Activates:
- Each Schemer takes 4 damage.
- Each Hero takes 2 damage and gains an Overcharge Token and a Reset Token (see Glossary).
- Remove the remaining Arcane Wall, then read on.
Reinforce
Deploy the following to the Arcane Lab:
Deploy the following to the Orb Room:
Stop Point
Lose Condition: The players lose if any Hero is Defeated. Win Condition: Defeat all Foes.
Epilogue
In the aftermath, Eve smirks and comments on the impossibility of fleshcrafting, while Zot acknowledges that the magio-historians were wrong about it. Deirdre, taking breaks from healing the wounded, expresses concern for the mystics’ victims, describing their suffering as awful. Fiona agrees, noting the victims’ hair loss. Gerki then shouts that he has found something uplifting and emerges with a large, ornate trunk. After picking the lock, he reveals valuable items inside. Zot and Eve discuss their incorrect assumptions about the mystics’ existence. Zot, engrossed in a book, notes the mystics’ involvement in city affairs and describes the Collegium Obscurati, a hidden, well-provisioned base. As he pulls a pen from the chest, it causes a reaction. Zot then finds a book with the symbol of the Ancient Order of Mystics and flips through it, revealing the mystics’ extensive reach and plans. The group feels a presence and prepares for future adventures.
Rewards
Unlock items from Vault 48 – 49.
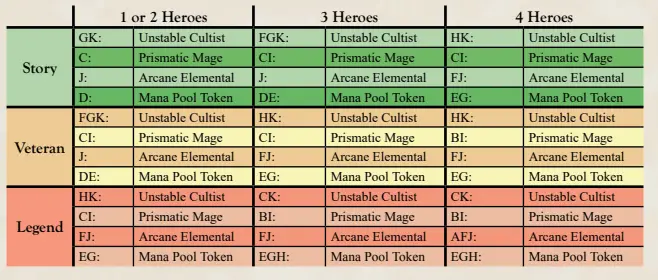
Scenario 6 The Observatory
Prologue
The trek up into the mountains is long and arduous. During the journey, Zot spends time monologuing about the intricacies of the Collegium, its politics, and his internal workings. By the time the group reaches the pine line and the upper mountains, only scrubbly-looking bushes and lichen-covered rocks remain. Zot, panting and leaning against a rock, questions the purpose of a ruined observatory so high up. Deirdre, Gerki, and Fiona discuss the amazing starry view and the observatory’s history, including the dragon attack that destroyed much of Greyport and the Collegium.
Zot and Pooky become nervous as they sense something. Pooky, rubbing his head, and Zot notice signs of recent magical activity. As they enter the observatory, Gerki jokes about damaged body parts, and Gog excitedly talks about horns. Fiona and Deirdre remain concerned. They find the observatory illuminated by a pearl-like glow, with signs of looting and damage evident.
The group moves cautiously through the shadowed foyer and into the main observatory chamber, which is elaborately decorated. They find signs of looters who have taken jewels, magical machinery, and other equipment. Amidst the remnants, they find three energy-focusing devices directed at a sarcophagus. The devices glow and emit bolts of chaotic energy, illuminating the area with prismatic light.
Deeper into the room, they discover papers and the remnants of the Ancient Order of Mystics, along with a group of slaves preparing to open the sarcophagus. A mystic explains that they are there to help complete the Mana Forge, leading to an enchanted living flesh product. As tensions rise, the heroes notice the goblin slaves preparing to escape with their bonds. The party steps forward to confront the mystics, and a chaotic battle ensues.
Map Features
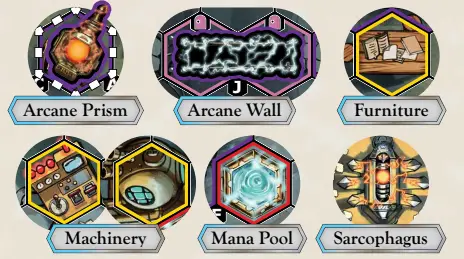
Arcane Prism – Impassable:
- These tokens are impassable.
- Can be used by adjacent Prismatic Mages or Heroes.
Arcane Wall – Impassable:
- These tokens are impassable.
- Removed when the nearby Machinery is destroyed.
Furniture – Difficult:
- Difficult spaces cost an additional point of Move to enter.
Machinery – Difficult:
- Difficult spaces cost an additional point of Move to enter.
- Machinery in each room with the Arcane Prisms must be destroyed.
- Mana Pool – Hazard:
- These spaces are dangerous and deal damage to figures that enter them.
- Deal damage to figures that occupy them during the Objective Phase.
- In this scenario:
- A figure that enters a Mana Pool space takes 2 damage.
- Any figure on a Mana Pool during the Objective Phase takes an additional 2 damage.
- Sarcophagus:
- All Arcane Prisms begin the scenario pointed at the Sarcophagus.
- Something is gaining strength within!
Setup
- Place the scenario map and Epic Pool in the middle of the play area.
- Place an Arcane Wall token on each of the double door spaces.
- Place an Arcane Prism token on each of the spaces with the white-dashed border.
- Point each Arcane Prism toward the Sarcophagus.
- Prepare the following schemers
- Put a tracker token on the space on the Arcane Golem track listed here.
- The Arcane Golem track is the track to the left of the Arcane Golem’s Scheme Block.
Deploy
Deploy the following to the Entryway
Heroes Setup
Each player does the following:
- Choose a Hero and take that Hero’s figure(s), Hero mat, reminder card(s), and initiative token(s), placing them in front.
- Choose 4 of your 6 Hero Cards and place them near your Hero mat (the other 2 will not be used this game).
- Choose 1 of each class of Item (1 Major Item and 1 Support Item) and place them near your Hero mat.
- Resolve any Setup Flags on your equipped Hero and Item Cards.
- Claim 3 spots on your Hero’s Power Tree.
- Deploy your Hero figure(s) on the map.
Arcane Prisms
- Action – Redirect the Prism:
- A Hero in a space adjacent to an Arcane Prism may point the adjacent Prism toward the Machinery in their room.
- Objective Phase:
- Each Arcane Prism will fire, including those in unrevealed rooms.
- When an Arcane Prism fires at the Sarcophagus, increase the Arcane Golem track by 1.
- When an Arcane Prism fires at Machinery, it deals 3 damage to each figure in the line from the Arcane Prism to the Machinery (including any figure on the Machinery space).
- The Prism then destroys the Machinery, achieving the associated Objective.
- Arcane Prisms will continue firing in each Objective Phase even after the Machinery in their room has been destroyed.
- An Arcane Prism may only be pointed at the Sarcophagus or the Machinery in the same room as the Prism itself.
Stop Point
Lose Condition:
- The players lose if any Hero is defeated.
Objective:
- Use the Arcane Prism to destroy the Machinery in the Entryway.
Begin the Game:
- If it’s the Objective Phase and the Entryway Machinery is destroyed, read on.
- If the Arcane Golem track reaches 17 at any time during a round, pause the current turn and resolve the Event “Overdrive” on page 9, then read on from that point.
Reinforce
Remove the Arcane Wall separating the Entryway from the Library, then deploy the following to the Library:
Stop Point
Lose Condition:
- The players lose if any Hero is defeated.
Objective:
- Use the Arcane Prism to destroy the Machinery in the Library.
Continue the Game:
- If it’s the Objective Phase and the Library Machinery is destroyed, read on.
- If the Arcane Golem track reaches 17 at any time during a round, pause the current turn and resolve the Event “Overdrive” , then read on from that point.
Event: Power Down!
The final panel explodes in a flash of brilliant light, only to be overshadowed by the sudden blast of each Arcane Prism shattering. The mages are thrown through the air, their energy sapped from their bodies, leaving fluttering robes drifting to the floor.
- Remove all Arcane Prism tokens from the map.
- Defeat all Prismatic Mages.
- Deploy the Arcane Golem in an unoccupied safe space adjacent to a Hero (players’ choice).
- Deploy the additional Foes listed in the Reinforce table below to unoccupied safe spaces adjacent to the Arcane Golem.
- Skip the Event “Overdrive!” and read on.
Event: Overdrive!
The mad mages laugh with glee as they funnel the last of their arcane energies into the prisms, only to shriek in terror as their bodies are pulled into those same prisms. Each prism shatters as the last of their energies blasts into the sarcophagus.
- Remove all Arcane Prism tokens from the map.
- If any rooms have not yet been revealed, remove all Arcane Walls and reinforce the revealed room(s) as described above.
- Defeat all Prismatic Mages (even ones that were just deployed).
- Each Hero gains a Stun token.
- Deploy the Arcane Golem in an unoccupied safe space adjacent to a Hero (players’ choice).
- Deploy the additional Foes listed in the Reinforce table below to unoccupied safe spaces adjacent to the Arcane Golem.
- The Arcane Golem will use two yellow initiative tokens instead of one.
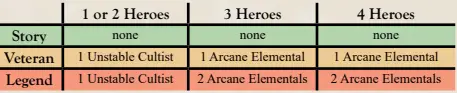
Reinforce
Deploy adjacent to the Arcane Golem
The Arcane Golem
Tiers
- Power Level Determination:
- Arcane Golem’s power level is determined by how much it was powered up by the Arcane Prisms.
- If the Arcane Golem track is less than 7, it has 15 Fortitude, 1 Toughness Token, and uses only its topmost Scheme effect.
- Each subsequent tier (7-10, 11-13, 14-15, 16+), the golem gains more Fortitude, Toughness, keyword effects, and a longer Scheme.
Variable Scheme
- At each tier, the golem’s Scheme includes all effects up to the tier it reached.
- Example: If the Arcane Golem reached tier 3, its scheme includes Leap, then Melee Attack, then Push, then Move.
- The Arcane Golem acts using its entire Scheme (up to its tier) in order from top to bottom.
Doom Icon
- Tiers 3 through 5:
- Arcane Golem has the Doom icon.
- All Attack rolls against the golem that include yellow dice must also include the Doom die, even at Story or Veteran difficulties.
- At Legend difficulty, roll the Doom Die once on attacks against the golem; avoiding a Doom “hit” costs 2 unavoidable damage instead of 1.
Stop Point
Lose Condition: The players lose if any Hero is Defeated.
Win Condition: Defeat the Arcane Golem and all Arcane Elementals.
Epilogue
With the battle over, Zot carefully disables the malfunctioning prisms of the Ancient Order of Mystics. The area still experiences a slight magical radiation, but less than expected. After defeating the mages, the heroes secure the magical weapons and free the goblins from their bindings and hoods. The grateful goblins, speaking in squeaky voices, express their thanks in a cacophonous din.
Deirdre inquires about their capture, and a goblin explains they were wandering the mountains for shiny items for King Torglesnarf. They attempted to escape the observatory but caused damage to the machinery. The goblins acknowledge that the Ancient Order of Mystics is back, misappropriating Collegium equipment for nefarious purposes.
The heroes decide to return to Greyport to inform Chancellor Darvison and plan the next steps. Fiona expresses her reluctance for long meetings, preferring direct action. Deirdre releases the goblins, offering help if the mystics trouble them again. The goblins salute and depart with a final squeaky cheer.
Rewards
Unlock items in Vault 50 – 51.
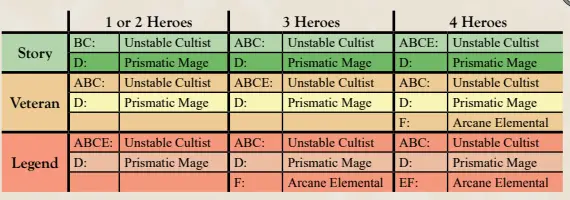
Scenario 7 – A Crime Too Far
Prologue
In the intricate networks of spies, agents, and informants within the Undercity, a particular network uncovers an alarming secret and sets a plan to inform the authorities. A coded message is passed secretly from the tunnels below the city to a dead drop outside the famous Inn. It travels through many hands before reaching its intended recipient, Gerki, at the Red Dragon Inn.
The party, gathered at the inn, scrutinizes the message. Gerki deciphers the note, which mentions the disappearance of slave traders and the involvement of the “Runners.” Concerned, the party decides to investigate the situation, knowing the Undercity well.
The investigation leads the party through narrow streets and into a warehouse near the docks. Despite the warehouse’s ramshackle appearance, the doors are secure. The party encounters dock hands and other toughs, who are displeased with the intrusion. Gerki negotiates with the workers, who grudgingly allow the party to search the premises. The party finds little evidence but continues to search.
Suddenly, they hear a key turn in a lock. Fiona senses danger and warns the group. The tension rises as they confront more of the Runners, leading to a skirmish. Fiona avoids a tripwire trap but a warrior bursts through a hidden doorway, attacking. The party evades and prepares to counterattack, ready to face the dangers ahead.
Setup
- Place the scenario map and Epic Pool in the middle of the play area.
- Place the round tracker token on the “1” space in the “Playing the Round” box.
- Randomly place the “A” and “B” Randomizer Tokens face down on spaces 3 and 5.
- Prepare the following schemers.

Deploy
Schemer Notes
- Skirmisher:
- The Harm effect on “There and back again” moves the Skirmisher away after hitting.
- If a Skirmisher’s initiative token is drawn while they are off the map (due to “Now you see me”), they do not act.
- The attack on “Now you see me” can target any adjacent Foe, not just the one whose initiative token was drawn.
Heroes
- Each player chooses a Hero and takes the Hero’s figure(s), mat, reminder card(s), and initiative token(s), placing them in front.
- Choose 4 out of 6 Hero Cards and place them near the Hero mat (the other 2 will not be used).
- Choose 1 Major Item and 1 Support Item and place them near the Hero mat.
- Resolve any Setup Flags on equipped Hero and Item Cards.
- Claim 3 spots on the Hero’s Power Tree.
- Deploy Hero figure(s) on the map.
- One Hero must be deployed on the gold Hero deployment space.
Map Features
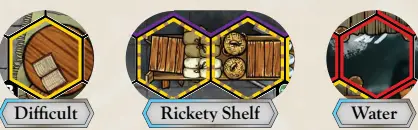
Difficult Spaces:
- The table and doorway are difficult spaces, requiring an additional point of Move to enter.
Rickety Shelf – Difficult:
- These spaces also cost an additional point of Move to enter.
- Heroes adjacent to or occupying a Rickety Shelf can use the “Look Out Below” Scenario Ability:
- Action: Look Out Below:
- Choose an adjacent or occupied Rickety Shelf.
- Place a Rubble Token adjacent to the shelf.
- Place a second Rubble Token adjacent to the first, if possible.
- Rubble Tokens cannot be placed on Difficult spaces, water spaces, or spaces with existing Rubble Tokens.
- If placed on an Occupied space, the occupying figure takes 4 damage.
- Rubble turns a space Difficult.
- If all Rubble Tokens are on the map, the Scenario Ability can no longer be used.
- Rubble Tokens are on the reverse side of the Mana Pool Tokens used in Scenario 6.
- Action: Look Out Below:
- Water – Hazard:
- These spaces are Dangerous and can only be entered via Forced Movement effects.
- Line of Fire can be drawn through water spaces.
- When a figure is forced into the water:
- Forced Movement stops.
- The figure is immediately placed on the nearest unoccupied non-water space.
- A Hero placed this way is stunned.
- A non-Hero placed this way takes damage.
- Traps and Wizard Fire cannot be placed on water spaces.
Stop Point
Objective:
- Survive until round 5.
Begin the Game:
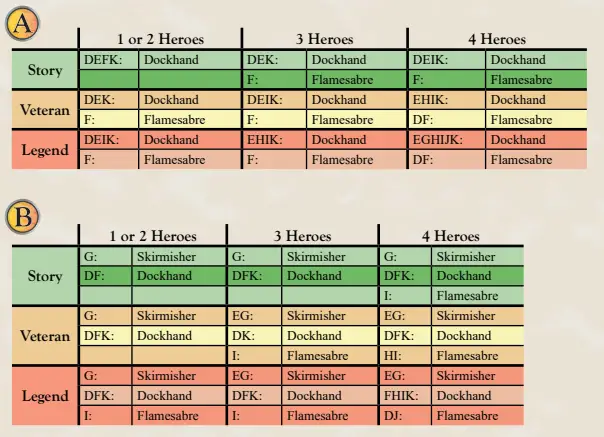
- When the round tracker moves to 3 or 5, reveal that round’s Randomizer Token and reinforce the map according to the following tables.
- After you have reinforced for round 5, read on.
Reinforce
Stop Point
Lose Condition:
- The players lose if any Hero is defeated.
Win Condition:
- Defeat all Foes.
Instructions:
- Remove the round tracker from the map.
- Continue playing rounds until the players win or lose.
Epilogue
“That’s one band of slavers who won’t be plaguing Greyport anymore,” says Deirdre, touching her holy symbol and thanking the Goddess. Gerki, examining the scattered paperwork on the table, calls Zot over to look. Zot reads the documents while Pooky sniffs a puddle of blood spreading across the table.
“Unfortunate,” Zot says, explaining that the slavers they captured were only money managers. Fiona, sensing more danger, remains ready for action. Gerki reveals that more smugglers in the Runners are still out there, trading black market goods. Zot finds a document indicating that a ship will rendezvous with buyers at sea in three nights to transfer units of “exotic merchandise.”
Deirdre, Gerki, and Fiona discuss the need to act swiftly. Fiona insists they can stop the operation with the right help. Zot agrees but notes they will need Captain Whitenhawk and her crew for assistance. Gog, adamantly against slavers, expresses his readiness to help.
Rewards
Unlock items in Vault 52 -53.
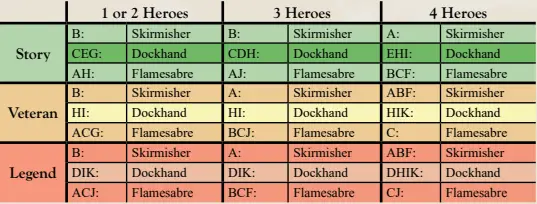
Scenario 8 – A Nefarious Cargo
Prologue
It is fortunate that the Crimson Drake is in the harbor. Captain Whitenhawk and her fearless crew have no love for slavers and are ready to help. Bryn the Boatswain ensures the cannons are loaded and the ship is ready. Zot hands over the documents to Captain Whitenhawk, who gives them a quick review before handing them to Tara, the ship’s blind, psychic navigator. Tara, after a moment, smiles and indicates that the night of the meeting will bring a sudden temperature drop, creating a thick fog that will obscure the ocean and allow the crew to close in on the slavers undetected. Captain Whitenhawk is pleased and agrees to the plan.
On the night of the rendezvous, the Crimson Drake sails out of Greyport’s harbor. As they approach the open sea, the fog thickens, and the ship is soon surrounded by a dense mist, just as Tara predicted. The crew spots the slavers’ ship in the distance. The Crimson Drake sails alone in eerie silence.
As the Drake draws closer, Captain Whitenhawk orders the crew to prepare for an ambush. The fog begins to thin, revealing the slavers’ ship. The Captain gives the signal, and the crew springs into action. A warning bell clangs on the enemy ship, and shouts are heard as the slavers realize the trap. The Crimson Drake fires its cannons, and Bryn aims precisely to avoid hitting the prisoners.
As the battle ensues, the Crimson Drake is hit but not critically damaged. Pooky and Zot tumble from the impact but recover quickly to continue fighting. The crew engages in close combat, determined to rescue the captives and defeat the slavers once and for all.
Setup
- Place the scenario map and Epic Pool in the middle of the play area.
- Place the round tracker token on the “1” space in the “Playing the Round” box.
- Prepare the following schemers.
Keywords
- Heroic:
- This figure is a Friend to the Heroes and a Foe to non-Heroic Schemers.
- Hookshot:
- This figure is unaffected by Water Hazards.
- If this figure would enter a Water space, any Forced Movement affecting it ends, and it is placed into the nearest unoccupied safe space adjacent to a Mast.
- Sea Dog:
- This figure cannot be Stunned.
- This figure cannot enter Water spaces.
- If this figure would be Defeated, it instead goes to 1 Fortitude and gains 2 Weaken Tokens.
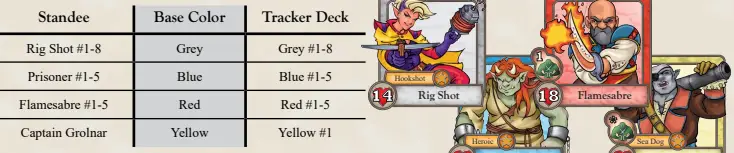
Schemer Notes
- Rig Shot:
- The Melee Attack on “I caught one” happens even if the Harm effect did not trigger.
- Prisoner:
- A figure is Stunned if it has a Stun Token.
- If a Prisoner is Defeated, they leave the map, taking shelter below decks on the Crimson Drake.
- Captain Grolnar:
- Cannon Swing: Attempts to move adjacent to 2 Foes. If Grolnar cannot do this with his Move, he simply moves toward a Foe instead.
- If Command Shot activates a Friend, that Friend activates whatever Scheme its Scheme Die shows. This is in addition to that Schemer’s regular turn for the round. If the activating Friend is Stunned, it just loses its Stun Token.
- If no Foe is attacked during the resolution of Grapeshot Blast, Grolnar instead attacks all other figures (Friends and Foes) on the same deck as him.
- For the purposes of this Scheme, the decks are the Crimson Drake, the Main Deck, and The Brig.
Deploy
Heroes Setup
Each player does the following:
- Choose a Hero and take that Hero’s figure(s), Hero mat, reminder card(s), and initiative token(s), placing them in front.
- Choose 4 of your 6 Hero Cards and place them near your Hero mat (the other 2 will not be used this game).
- Choose 1 of each class of Item (1 Major Item and 1 Support Item) and place them near your Hero mat.
- Resolve any Setup Flags on your equipped Hero and Item Cards.
- Claim 4 spots on your Hero’s Power Tree.
- Deploy your Hero figure(s) on the map.
Map Features
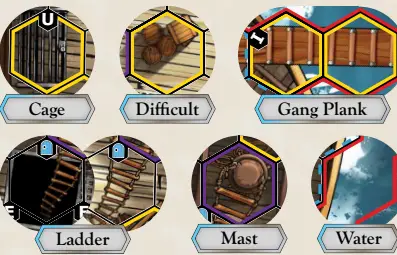
- Brig:
- Located below the Main Deck, connected by Ladders.
- Cages in the Brig are difficult spaces, costing an additional point of Move to enter.
- Some cages contain prisoners; you need to go to the Brig to see which ones.
- Cage – Difficult:
- Difficult spaces in the Brig requiring an additional point of Move to enter.
- Crimson Drake:
- Any space not part of the Main Deck or Brig is part of the Crimson Drake.
- Difficult:
- Many spaces on this map are Difficult and cost an additional point of Move to enter.
- Gang Plank:
- Connects two ships and is narrow.
- Figures may not pass through other figures unless one is Tiny or in the midst of a Leap.
- Difficult spaces, costing an additional point of Move to enter.
- Ladder:
- Connects the Main Deck to the Brig.
- For movement, Melee Attacks, and Ranged Attacks:
- Two blue door spaces are considered adjacent.
- Two lavender door spaces are considered adjacent.
- Burst Attacks may not be split between the Main Deck and the Brig.
- Main Deck:
- The spaces surrounded by the blue dashed line are the Main Deck.
- Mast – Impassable:
- These spaces are Impassable.
- Figures with Hookshot are placed next to a Mast if they would enter a Water space.
- Water – Hazard:
- Dangerous spaces, entered only via Forced Movement effects (Line of Fire may be drawn through them).
- Forced Movement stops if a figure is forced into water, and it is placed on the nearest unoccupied non-water space.
- When a Hero is placed in this way, Stun that Hero.
- When a non-Hero is placed in this way, it takes 2 damage.
- Traps and Wizard Fire may not be placed on Water spaces.
Stop Point
Lose Conditions:
- The players lose if any Hero is defeated.
- If it’s the Objective Phase of round 6 and no Heroic figure has entered the Brig, the pirates begin “liquidating the cargo” and the players lose.
Objective:
- Fight your way to the Main Deck.
Begin the Game:
- When a Heroic figure enters the Main Deck, pause the current turn and read on.
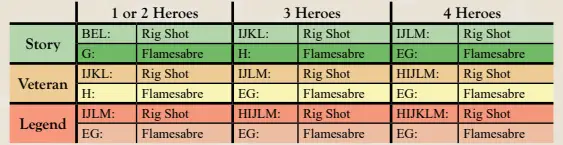
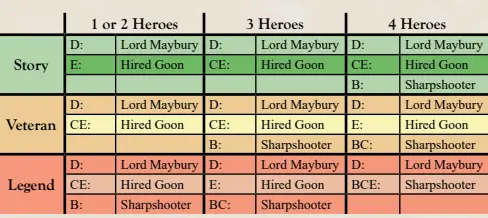
Reinforce
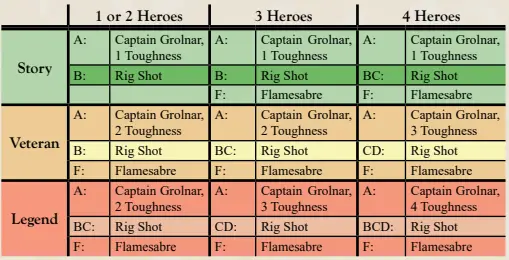
Deploy the following. Note that Captain Grolnar is deployed with a variable number of Toughness Tokens, depending on the difficulty and the number of Heroes.
Stop Point
Lose Conditions:
- The players lose if any Hero is defeated.
- If it’s the Objective Phase of round 6 and no Heroic figure has entered the Brig, the pirates begin “liquidating the cargo” and the players lose.
Objective:
- Fight your way to the Brig.
Continue Playing:
- When a Heroic figure enters the Brig, pause the current turn and read on.
Reinforce
Deploy the following. When deploying Prisoners, deploy them with their figures lying down. Do not add the blue initiative token to the initiative bag yet.

Prisoners
- Each Prisoner:
- Trapped on their deployment space and cannot act until freed by a Hero with the following Scenario Ability:
Action: I’m Here to Rescue You!
- Effect: Free an adjacent Prisoner.
- Details:
- While lying down, a Prisoner is avoided by Schemers.
- When freed, stand the Prisoner’s figure up.
- When the first Prisoner is freed, roll a Scheme Die for its group and add its initiative token to the bag.
- Freed Prisoners will act whenever their initiative token is drawn, just like other Schemers.
Winning the Scenario:
- Captain Grolnar:
- Cannot be defeated due to his Sea Dog keyword and must be captured instead.
- To Capture Grolnar:
- All Prisoners must be freed.
- There must be no more Rig Shots or Flamesabres on the map.
- Any Hero may take the “You’re Coming With Us” Scenario Action from anywhere on the map.
Action: You’re Coming With Us!
- Effect: If there are no Rig Shots or Flamesabres on the map, and all Prisoners have been freed, the Heroes capture Captain Grolnar, the game ends, and the players win.
Stop Point
Lose Conditions:
- The players lose if any Hero is defeated.
- If it’s the Objective Phase of round 12 and Captain Grolnar has not been captured, the ships the pirates were scheduled to rendezvous with appear on the horizon. The Crimson Drake must pull away lest it be overwhelmed. The players lose.
Win Condition:
- Capture Captain Grolnar before the end of round 12.
Epilogue
The prisoners are freed and express gratitude without venting frustration at their imprisonment. The surviving slavers remain subdued. As the fighting subsides, Captain Grolnar takes a knee, offering his cutlass to Captain Whitenhawk. Fiona, impatient for ceremonial surrender, grabs Grolnar in a headlock demanding answers about his cargo and destination.
Captain Grolnar, struggling in Fiona’s grip, reveals that the slaves were acquired for Lord Maybury. Zot identifies Maybury as a wealthy man contributing significantly to the Great Temple. Grolnar implies he is just the middleman, delivering to whoever orders the slaves. Fiona tightens her grip, and Grolnar, gasping, admits he has little information on the buyers.
Grolnar’s desperate attempts to speak clearly amid Fiona’s grip loosening reveal his distress and compliance. He suggests a plaque commemorating the acquisition on the altar. Fiona, unsatisfied with his responses, continues to press for more information.
Gerki observes quietly, drumming his fingers on the railing. Zoog expresses admiration for Grolnar, asking for an autograph and calling him the greatest adventurer. Grolnar, sensing relief from Zoog’s distraction, turns to offer a final toothy smile before Zoog faints in excitement. The party feels a mix of relief and anticipation for the next adventure.
Rewards
Unlock items in Vault 54 – 55
Scenario 9 – The Manse Trap
Prologue
Having liberated the ogres, arrested the surviving smugglers, and taken the Runners’ ship into town, you return to Greyport Harbor. You turn over the freed ogres to the Harbor Patrol and request that the captured smugglers be transferred to the City Guard. Zot protests, but the Patrol insists the seafaring slaves are on land and under their jurisdiction.
Later that evening, you help incarcerate the surviving slavers at City Guard headquarters, except for Captain Grolnar, whom you take to the Danger Room beneath the Red Dragon Inn for interrogation. Deirdre expresses distrust, indicating a likely storm. Grolnar, tied to one of the room’s broken chairs, pleads for trust, but the team remains cautious.
Gerki proposes a plan to complete the handoff, making it look real, and then donate the money to the Great Temple Reconstruction Fund. Grolnar agrees reluctantly. Gerki handles the ropes, ensuring Grolnar’s secure restraint. Later, the party approaches Lord Maybury’s estate, posing as guards escorting the captured Runners. The real guards are surprised but allow you entry, locking you in a large cage.
Captain Grolnar watches the proceedings and exchanges his customary garrulousness for a plan to betray you. He agrees to the deal to keep his word, yet Deirdre and the team prepare for potential betrayal. At Maybury’s estate, the guards thoroughly inspect your group. One guard drops her disguise and stealthily unlocks your cages.
In disguise, you enter the lavishly decorated estate, blending in among the other guests and guards, waiting for the perfect moment to complete your mission.
Setup
- Place the scenario map and Epic Pool in the middle of the play area.
- Put a door token on each of the four blue door spaces.
- Put a tracker token on the space corresponding to the difficulty level you wish to play in the “Door Fortitude” box on the map.
- Prepare the following schemers.
Deploy
Heroes Setup
Each player does the following:
- Choose a Hero and take that Hero’s figure(s), Hero mat, reminder card(s), and initiative token(s), placing them in front.
- Choose 4 of your 6 Hero Cards and place them near your Hero mat (the other 2 will not be used this game).
- Choose 1 of the “improvised items” from Scenario 1 and place it near your Hero mat:
- Barstool
- Crystal Shot Glass
- Icon of Godliness
- Pot Lid
- Soup Spoon
- Wizard Bathrobe
- Resolve any Setup Flags on your equipped Hero and Item Cards.
- Claim 5 spots on your Hero’s Power Tree.
- Deploy your Hero figure(s) on the map.
Special Item Setup:
- Because of your disguise, you don’t have your usual weapons! Each Hero starts with one of the “improvised items” listed above. Resolve its Setup Flag when equipped.
The Gear Locker:
- During Setup, players may choose up to four other Items from the Armory and place them face up near the Gear Locker in the bottom left of the map.
- A Hero on or adjacent to the Gear Locker space may use the following Scenario Ability:
Action: Arm Up!
- Effect: Equip an Item from the Gear Locker. A Hero may only use this ability once per game.
- Details:
- You may equip a Major Item from the Gear Locker even if your starting Item is a Major Item.
- When you equip an Item from the Gear Locker, resolve its Setup Flag immediately.
- Solo Mode Companions may not equip Items from the Gear Locker.
Map Features
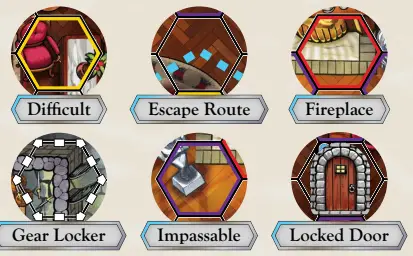
- Difficult:
- Yellow-bordered spaces are Difficult and cost an additional point of Move to enter.
- Escape Route:
- The dashed blue line is Maybury’s Escape Route. When Maybury moves, he follows this line, pushing other figures out of his way.
- If he gets to the exit (space N), the players lose!
- Fireplace – Hazard:
- These spaces are Dangerous and deal damage to figures that enter them.
- They also deal damage to figures that occupy them during the Objective Phase.
- In this scenario:
- A figure that enters a Fireplace space takes 2 damage.
- Any figure on a Fireplace during the Objective Phase takes an additional 2 damage.
- Gear Locker:
- Holds items that may come in handy.
- Each Hero may take one Item from the Gear Locker by using the Scenario Ability described above.
- Impassable:
- Purple-bordered spaces are Impassable.
- Locked Door:
- The doors in this scenario are locked.
- They are Impassable, Immobile, Destructible, and block movement and Attacks.
- Tokens may not be placed on them.
- Locked Doors may be attacked by Heroic figures.
- When a Heroic figure uses an Attack, they may target a Locked Door as though it were a Foe while resolving the Attack.
- Locked Doors have:
- 1 Fortitude at Story difficulty
- 3 Fortitude at Veteran difficulty
- 5 Fortitude at Legend difficulty
- Track a Locked Door’s damage directly on that door.
- If a Locked Door takes damage greater than or equal to its Fortitude, remove it from the map.
- When a Locked Door is removed, revealing a new room for the first time, immediately Reinforce that room.
- Damaging a Locked Door will trigger Harm effects on the Attack that damaged it.
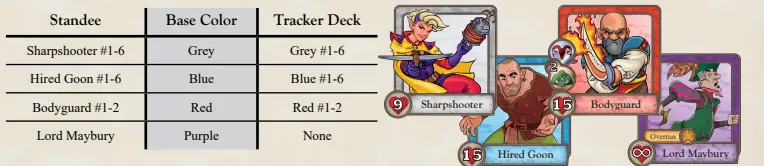
Bodyguard
- Defeat Requirement:
- You must defeat Maybury’s bodyguard(s) to win this scenario.
- In addition to Toughness Tokens, Bodyguards also have the Doom icon.
- All Attack rolls that include a Bodyguard as a target must include the Doom Die, even at Story and Veteran difficulties.
- At Legend difficulty, removing the Doom Die from a roll against a Bodyguard costs 2 unavoidable damage rather than the usual 1.
Jailbreak!
- Initial Advantage:
- You have the drop on the sleeping guard, so the figure in the room with you does not get a turn in the first round!
- Turn Order:
- Heroes take their Round 1 turns in the order of the players’ choice.
- Take the initiative tokens that you would normally use for the Heroes (or Solo Mode Companion) and resolve them in any order, without using the initiative bag.
Stop Point
Lose Condition:
- The players lose if any Hero is defeated.
Objective:
- Play Round 1.
Begin the Game:
- Read on when you reveal the Office, or during the Objective Phase of Round 1 if you haven’t revealed the Office by then.
Deploy
Deploy the following, even if the Office has not yet been revealed. Figures deployed in this way will act starting in Round 2. Lord Maybury uses 1 initiative token
Lord Maybury
- Immune to Damage:
- Takes no damage from any source due to protection money and the party’s desire to capture rather than kill him.
- Immune to Harm effects.
- Maybury’s Captor:
- A Hero that begins a non-forced Move or Leap effect while adjacent to Maybury may choose to remove Maybury from the map and place him on their Hero mat, becoming Maybury’s Captor.
- While on a Hero mat, Maybury’s Captor must be careful, as Schemers will aggressively target them.
- Maybury can harass and damage his Captor; this damage does not count as an Attack.
- Other Heroic figures such as Allies, Illusions, and Pooky may not capture Maybury.
- Acts Every Round:
- Maybury will always take a turn when his initiative token is drawn, even if he is not on the map.
Movement:
- Maybury’s Move Scheme always moves along the Escape Route towards space N, the exit space.
- If not on the Escape Route, he will first take the shortest path back to it and then use any remaining movement points to move along the Escape Route.
Overrun:
- Maybury has the Overrun keyword, meaning he pushes other figures (Friend or Foe) out of his way.
- When Maybury enters a space with another figure, that figure is placed in the nearest unoccupied space to Maybury.
- Multiple spaces are tied for nearest, players choose.
- Pooky is not affected by Overrun due to his Tiny keyword.
Locked Doors:
- Maybury has the key to the Locked Doors.
- Maybury or Maybury’s Captor may enter spaces containing Locked Doors, ending their current movement effect and removing the Locked Door from the map.
- This reveals a new room; reinforce that room.
- Locked Doors may still be attacked by Heroic figures.
Hired Goon:
- At the end of each of Maybury’s Schemes, the nearest Hired Goon activates.
- This is in addition to that Goon’s regular turn for the round.
- If the activating Goon is Stunned, it just loses its Stun Token.
Solo Mode:
- In Solo Mode, your Companion may capture Maybury by beginning a movement effect while adjacent to him.
- If your Companion becomes Avoided or is removed from the map, Maybury returns to the map on the Companion’s space.
Stop Point
Lose Conditions:
- The players lose if any Hero is defeated.
- The players lose if it’s the Objective Phase and Lord Maybury is on space N.
Win Condition:
- The players win if it’s the Objective Phase, Maybury’s Captor is on space N, and all Bodyguards have been defeated.
Continue Playing:
- Starting with Round 2, draw initiative tokens from the bag as normal.
- When the Waiting Room or the Entryway are first revealed, reinforce the revealed room using the tables below.
- If the players win, continue to the Epilogue.
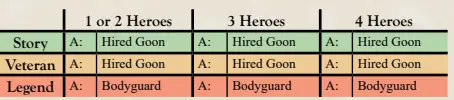
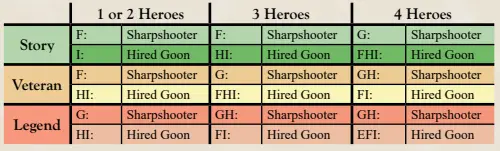
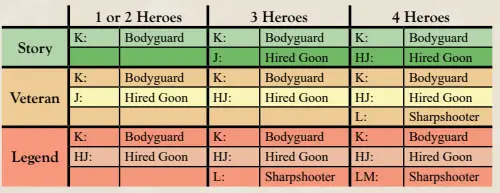
Reinforce
When the Waiting Room is first revealed, deploy the following:
When the Entryway is first revealed, deploy the following:
Epilogue
“You’re under arrest for slave trading, Lord Maybury,” Deirdre declares, dragging the nobleman to his feet. Maybury protests, claiming the slaves weren’t for him and that he bought them for someone else. Deirdre demands to know his contact, but Maybury insists he was just a middleman. Fiona, skeptical, pushes for more information. Pooky, perched on Zot’s shoulder, grins menacingly, causing Maybury to pale.
Deirdre warns Maybury that the party went through a lot of trouble to capture him. Maybury, with an indifferent shrug, claims ignorance about his contact’s identity. Gog, not willing to tolerate more lies, roughly slams Maybury against the nearest wall. Several curious onlookers, including guards, observe the confrontation.
Maybury finally reveals he bought the slaves, but doesn’t name his contact. Zot insists on adhering to rules and suggests taking him to the City Guard for processing. Gog, frustrated but compliant, drags Maybury to the door.
After a lengthy wait at the City Guard headquarters, the party is discharged into the bright morning light of Greyport. They are confident the guards would have simply slapped Maybury on the wrist without their intervention. Fortunately, the guards, recognizing the seriousness of the charges, vow to investigate further. The party receives praise for their bravery and is eager for their well-deserved prize. Fiona vows to keep an eye on the proceedings, ensuring justice is served. Deirdre praises the Goddess as they leave, their mission successfully completed.
Rewards
Unlock items in Vault 56 – 57.
Scenario 10 – Vault
In between your recent harrowing adventures, Zot tries to meet with Chancellor Darvishon of the Mages’ Collegium to discuss the Ancient Order of Mystics. Although Zot is a faculty member, Darvishon’s busy schedule delays the meeting. Eventually, Zot secures a meeting, emphasizing its urgency. The party is ushered into the chancellor’s office, where Darvishon, a tall and dignified man, listens to their account.
Zot recounts the discovery of the Ancient Order of Mystics, the prisms, the sea battle, and Lord Maybury. Darvishon, intrigued and concerned, notes the seriousness of the findings. He agrees to listen, noticing the urgency in the party’s narrative. As Zot speaks, Pooky’s antics lighten the mood, but the gravity of the situation is clear.
During the explanation, an explosion occurs, shaking the office. Darvishon rushes to a small marble table holding a globe, revealing an image of a vault under attack. The chancellor identifies it as the Collegium’s Vault, housing valuable and dangerous magical artifacts. He orders the party to the vault to stop the thieves and prevent further damage.
The Collegium Vault is described as a strange place, filled with floating platforms, magical books, scrolls, and other paraphernalia. The party arrives to find the vault ransacked, with mystics searching for specific items. They prepare to navigate the vault, aware that they must act quickly to prevent the thieves from escaping with powerful artifacts.
Darvishon hints at a possible solution to help the party reach the higher platforms. With urgency, the party prepares for the challenge ahead, knowing that the fate of Greyport may depend on their success.
Setup
- Place the scenario map and Epic Pool in the middle of the play area.
- Put a tracker token on the “1” space on the round track in the “Playing the Round” box.
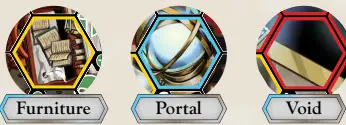
- Shuffle the four Randomizer Tokens and put them face down on spaces 3, 5, 7, and 9 on the round track.
- (If you are playing at Legend difficulty, put the Randomizer Tokens on spaces 3, 5, 7, and 8 instead.)
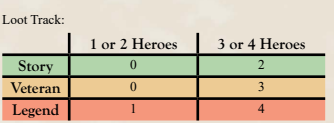
- Put a tracker token on the Loot Track on the space indicated in the table to the right.
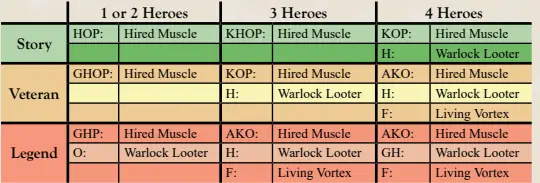
- Prepare the following schemers.

Keywords
Looter: When this figure is Defeated, reduce the Loot Track by 1.
Deploy
Map Features
- Furniture – Difficult:
- Difficult spaces cost an additional point of Move to enter.
- All Difficult spaces on this map count as Furniture.
- If a Scheme instructs a figure to move toward Furniture, that figure will enter a Difficult space if possible.
- Platform:
- The map is divided into four platforms, separated by Void.
- Heroic figures may Leap from one platform to another over the Void.
- Heroic figures may also move from one platform to another using a Portal.
- Non-Heroic figures stay on their platform unless subject to Forced Movement.
- If a Scheme instructs a figure to move toward a Foe on its platform but there are no Foes on its platform, it doesn’t move.
- Ranged Attacks by any figure may cross the Void from one platform to another.
- Portal:
- The four Portal spaces are considered adjacent to one another for the purpose of movement (including Forced Movement), Melee Attacks, and Ranged Attacks.
- Burst Attacks may not be split between platforms; they only affect Foes on the same platform as the attacker.
- Non-Heroic figures do not use Portals unless via Forced Movement from a Heroic figure.
- Non-Heroic figures may not attack through Portals.
- When pushing a figure through a Portal, you may push it in any direction away from that Portal.
- Void – Hazard:
- The Void consists of the Dangerous spaces surrounding each platform.
- These spaces may not be entered except via Forced Movement or a Leap effect by a Heroic figure.
- A figure Leaping over Void may not land on a Void space.
- If a figure is forced into a Void space, the Forced Movement effect ends, the figure takes 2 damage that may not be prevented, and the figure is placed in the nearest unoccupied space on the map.
- If there is a tie for nearest, the players choose.
- This could cause the figure to end up on a different platform than the one on which they started.
- Line of Fire may be drawn through Void by any figures, Heroic or otherwise, so any figure may make a Ranged Attack from one platform to another.
Loot Track
- Progress Tracking:
- The looters’ progress is shown on the Loot Track at the bottom of the map.
- If the Loot Track is on 15 during the Objective Phase, the players lose.
- Advancing and Reducing the Loot Track:
- Many Schemes advance the Loot Track.
- Players can reduce the Loot Track by defeating Schemers with the Looter keyword.
- Each time a Schemer with Looter is Defeated, reduce the Loot Track by 1.
- Limits:
- The Loot Track may never go below 0 or above 15.
- If it would go above 15, instead, each Hero takes 1 damage for each point it would go above 15.
- This counts as a single instance of damage to each Hero.
Heroes Setup
Each player does the following:
- Choose a Hero and take that Hero’s figure(s), Hero mat, reminder card(s), and initiative token(s), placing them in front.
- Choose 4 of your 6 Hero Cards and place them near your Hero mat (the other 2 will not be used this game).
- Choose 1 of each class of Item (1 Major Item and 1 Support Item) and place them near your Hero mat.
- Resolve any Setup Flags on your equipped Hero and Item Cards.
- Claim 5 spots on your Hero’s Power Tree.
- Deploy your Hero figure(s) on the map.
Stop Point
Lose Conditions:
- The players lose if any Hero is defeated.
- The players lose if it’s the Objective Phase and the Loot Tracker is on 15.
Win Condition:
- The players win if it’s the Objective Phase of Round 11 and the Loot Tracker is not on 15.
Begin the Game:
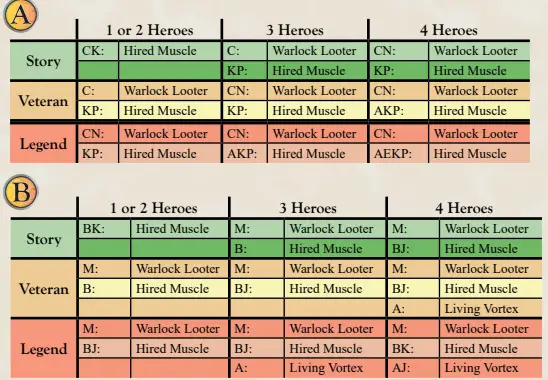
- When the round tracker gets to a Randomizer Token, reveal that token and reinforce based on the tables below.
- If the players win, continue to the Epilogue.
Reinforce
Epilogue
After a pitched and desperate battle, you have defeated the Ancient Order of Mystics, along with their allies and summoned elementals. You have also prevented them from making off with any of the magical items they needed for their nefarious purposes.
Shortly after the battle, Collegium security personnel teleport into the Vault. They use powerful spells to place the surviving rogue wizards into temporal stasis before informing Chancellor Darvishon that they will be taken to an anti-magic prison. Gerki, eyeing the still-growing hole in the chamber wall, hopes the Vault is more secure than it appears.
Zot elbows him as Darvishon approaches, all smiles and handshakes. Darvishon thanks the party for neutralizing the threat to the Collegium and ensuring the safety of the students, faculty, and staff. Zot responds modestly, trying to extricate his hand from the chancellor’s grip. Darvishon, with an appraising look, mentions hearing of adventurers enjoying a certain ritual after a successful escapade.
The chancellor suggests heading down to the Red Dragon Inn, his treat. The party agrees, offering thanks to Darvishon and his generosity. Fiona lifts her bloodied sword in cheer at the prospect of drinking at the Red Dragon. Gerki, with a grin, winks at the chancellor, indicating they expect to be treated well for quite some time. Zot elbows Gerki again, but the plucky thief continues grinning.
Rewards
Unlock items in Vault 58-77
Archive the following:
- Deirdre:
- Start Card 1 – Wings of Elaana
- Vault Card 34 – The Goddess is generous with her gifts
- Eve:
- Start Card 1 – Oh, are you blinded
- Start Card 2 – Look into my eyes
- Fiona:
- Start Card 1 – I don’t wear all this armor just for defense
- Vault Card 40 – Luckily for me, I was wearing my armor
- Gerki:
- Start Card 1 – A little bit of contact poison always hurts
- Start Card 2 – Hit and run
- Gog:
- Start Card 1 – Gog still reach you
- Vault Card 10 – Make room for Gog
- Zot:
- Start Card 2 – Duplicated Force Bolt
- Vault Card 12 – A wizard rarely causes “spontaneous” combustion